Rampant piracy is pretty much a “feature” of publishing software on the internet, and any author of a semi-popular app will be well-acquainted with it. Not a day goes by when I don’t see pirated copies of my app shared via Google Drive, Dropbox, and all kinds of shadier file sharing sites.
But now I’ve discovered an even more disturbing dimension to this seediness. The problem with Android apps (and any Java-based software, really) is that it’s very easy to reverse-engineer, even when the code is obfuscated. Given enough time and manpower, it’s possible to recreate nearly the original source code from the compiled app. It’s analogous to reconstructing a shredded piece of paper – it simply takes some time to find all the strips and glue them together.
So I recently received a communication from a Chinese user who alerted me that this is precisely what’s happening in China. My app is being deconstructed and repackaged under a different name. But worst of all, they have inserted their own payment mechanism into the app, which requires the user to submit a payment before the app can be used! According to my Chinese whistle blower, this counterfeit version of DiskDigger is being used by tech support departments that send the app to the user, make them install it, and then wait for payment before assisting the user further.
I generally turn a blind eye to most of the piracy of my apps, since it’s humanly impossible to continually track down violators, but this new kind of perversion makes me feel truly powerless. Without having any legal representation in China, there is literally nothing I can do to combat these bad actors. Perhaps it’s time to research how to establish a legal presence in China. If you have any experience with this, feel free to contact me. And in the meantime, when looking for DiskDigger, insist on the original!
It’s not often that I come across a data recovery story in my own personal life, but recently I came across just such a story, and a rather unusual one at that.
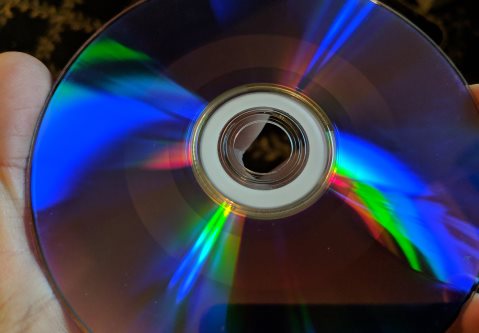
You see, my mother-in-law has several video recordings of my wife from her middle school and high school years, which I naturally couldn’t wait to watch, much to her embarrassment. These recordings are saved on a number of DVD-R discs. I’m guessing that my mother-in-law recorded the videos on a camcorder (onto compact tapes), and then hooked up the camcorder to a DVD recorder and burned DVDs from the contents of the tapes. (In the early-ish days of DVDs, there were standalone DVD recording devices into which you could plug in a video input, and it will continuously write the video to the DVD.)
But, to my disappointment, when I inserted these discs into the DVD drive in my computer, they appeared completely blank. One after another, the same thing: the disc contains no files, and the system reports it having a capacity of 0 MB (with no errors or warnings), even though it was visually apparent by the burn marks that the discs had data on them. I tried reading them on a different computer, with the same result.
Since the problem seemed to be affecting all of the discs, we can conjecture that it was the DVD recorder’s fault, where it might have somehow recorded the data incorrectly, or failed to close the recording session, etc. But can there be a way to access the data that was written to the disc?
The standard way to get the total size of a disk (using the Windows API) is to call the DeviceIoControl function and get a DISK_GEOMETRY_EX structure that contains the dimensions of the disk. Calling this function on these discs was returning a size of just 2048 bytes, or just one sector, since optical discs usually have a sector size of 2048 bytes.
But just because the OS is telling us that the disk is a certain size doesn’t mean we can’t attempt to explicitly read beyond that limit. We can use the ReadFile function to brute-force the system into reading the disk at any location we specify. It may simply be that the driver is reporting an incorrect total size for the disk, while other areas of the disk might still be accessible.
So, I attempted to read the disc beyond the first sector. Reading the second, third, fourth, etc. sectors was returning errors, as might be expected, but I continued reading, and at around the 16000th sector, it started returning data! It’s almost as if the disc’s contents didn’t start until sector 16384. Onward from that point, the data could be read successfully all the way to the end of the disc.
Now, in order to actually recover the files present on the disc, we could potentially use DiskDigger to scan and carve any recoverable files from the raw data. But I wanted to go a step further: up until this point, DiskDigger did not support any optical disc file systems, and since I haven’t dealt with a lot of CD/DVD recovery cases, I admittedly wasn’t totally familiar with the file systems used in optical discs, which presents a perfect opportunity to learn.
The most basic and original file system used in these discs is ISO 9660, otherwise known as ECMA-119. This is a very simple file system without any special affordances like journaling, access control, etc., which is perfectly adequate for read-only media where the data is written once, and will not need to be modified again.
Later, Microsoft developed the Joliet extensions to the ISO 9660 file system, which basically added support for Unicode file names, while remaining backwards-compatible by introducing a supplementary volume descriptor. This way, systems that support only the original ISO 9660 would continue to use the original volume descriptor, and systems that support Joliet will know to look for the new volume descriptor. So basically, Joliet-formatted disks have two directory trees (one Unicode, the other non-Unicode), with the same file entries in each tree pointing to the same content on the disk.
And finally, by the time DVDs came around, the UDF file system (Universal Disk Format), also known as ECMA-167, was standardized. It’s not backwards-compatible with ISO 9660, but discs that are formatted with UDF usually also have a stub ISO 9660 volume that tells the reader to look for a UDF volume on the same disk. UDF is quite a bit more sophisticated, since it’s intended to be suitable for re-writable media, as well as multiple sessions on the same disk, but it’s still not nearly as complex as NTFS or ext4.
By the way, UDF can also be used on regular disks, not just optical disks. Here’s a little-known trick: it’s actually possible to format any disk as UDF by executing this command in an elevated command prompt: format <drive>: /fs:UDF
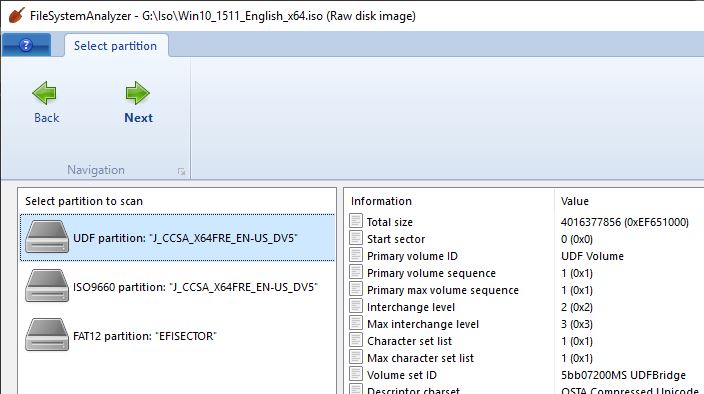
So, after poring over the ECMAspecifications (real page-turners, I assure you), I implemented support for these file systems in DiskDigger, as well as in my FileSystemAnalyzer tool.
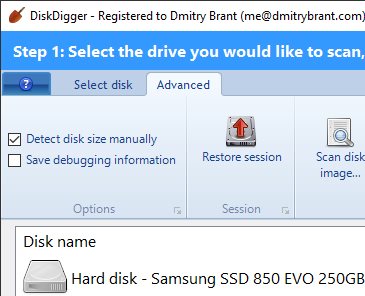
When you use DiskDigger to scan a CD or DVD (or an .ISO image), it will simply dump the contents of the disk and make all the files available for you to save. The ISO 9660 and UDF file systems don’t really have a concept of “deleted” files, so DiskDigger will present all the files for recovery, even if they are still accessible by normal means. The benefit of this is that DiskDigger can now also scan the disk beyond the size reported by the OS (which was the issue I detailed above), and find these file systems in the space of the disk that is not accessible by normal means. You can do this by launching DiskDigger, going to the Advanced tab, and selecting the “Detect disk size manually” checkbox.
And in FileSystemAnalyzer, you can now examine these file systems in great detail. When you open an optical disk (or disk image), if it contains an ISO 9660 file system, it lets you examine and navigate it. If the disk contains a Joliet file system, it lets you examine it as either Joliet or ISO 9660, by letting you select which volume descriptor to use. And if the disk contains a UDF file system, it lets you examine it or the stub ISO 9660 volume that usually comes along with it.
This rounds out support for optical disk file systems in DiskDigger and FileSystemAnalyzer! It’s admittedly a bit late, and also a bit overkill, since it’s true that data recovery cases involving optical disks are few and far between, but it’s good to know that even these sorts of cases can now be handled easily and smoothly.
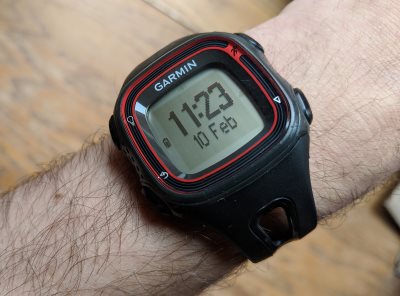
One would have thought that the FAT12 file system was safely a relic of the 1980s and 1990s, when it was used as the default file system for floppy disks and very early hard disks. FAT12 would be entirely impractical today, since it can only cover a maximum of 32 MB of disk space. However, I was surprised to find it very much alive today, in the most unlikely of places.When I go running, I use my trusty Garmin Forerunner 10 watch, which uses GPS to record my position and pace during the run. When I connect the watch to the USB port on my PC, it appears as a mass storage device, and allows me to retrieve the workout files (stored in the FIT format). It hadn’t occurred to me until now to check out the finer details of this mass storage device, but there were a few things that surprised me:
The entire size of the watch’s flash memory is actually just one megabyte! I’m guessing this is because they want to discourage users from using the watch for general storage (i.e. dumping of photos, documents, and so on), thereby unnecessarily wearing out the flash memory. It also encourages the user to offload the workout files relatively often, in case the memory ever gets corrupted or the watch is lost. It’s also possible that this watch uses a more expensive type of flash memory (one that is more resilient to wear and tear), which would make it prohibitively expensive to provide multi-gigabyte sizes that we breezily expect in today’s USB flash drives.
You guessed it: it uses FAT12 to organize the files in the flash memory. Because why not! With a total disk space of 1 MB, this is really the simplest and most compatible solution they could have chosen.
Therefore, hats off to Garmin for not overcomplicating things, and making use of a tried and tested solution that is sure to remain compatible and future-proof.
Lately I’ve been studying up on ray tracing, and one of my goals has been to build a nonlinear ray tracer — that is, a ray tracer that works in curved space, for example space that is curved by a nearby black hole. (See the finished source code!)
In order to do this, the path of each ray must be calculated in a stepwise fashion, since we can no longer rely on the geometry of straight lines in our world. With each step taken by the ray, the velocity vector of the ray is updated based on an equation of motion determined by a “force field” present in our space.
This idea has certainly been explored in the past, notably by Riccardo Antonelli, who derived a very clever and simple equation for the force field that guides the motion of the ray in the vicinity of a black hole, namely
I decided to use the above equation in my own ray tracer because it’s very efficient computationally (and because I’m not nearly familiar enough with the mathematics of GR to have derived it myself). The equation models a simple Schwarzschild black hole (non-rotating, non-charged) at the origin of our coordinate system. The simplicity of the equation has the tradeoff that the resulting images will be mostly unphysical, meaning that they’re not exactly what a real observer would “see” in the vicinity of the black hole. Instead, the images must be interpreted as instantaneous snapshots of how the light bends around the black hole, with no regard for redshifting or distortions relative to the observer’s motion.
Nevertheless, this kind of ray tracing provides some powerful visualizations that help us understand the behavior of light around black holes, and help demystify at least some of the properties of these exotic objects.
My goal is to build on this existing work, and create a ray tracer that is more fully featured, with support for other types of objects in addition to the black hole. I also want it to be more extensible, with the ability to plug in different equations of motion, as well as to build more complex scenes, or even to build scenes algorithmically. So, now that my work on this ray tracer has reached a semi-publishable state, let’s dive into all the things it lets us do.
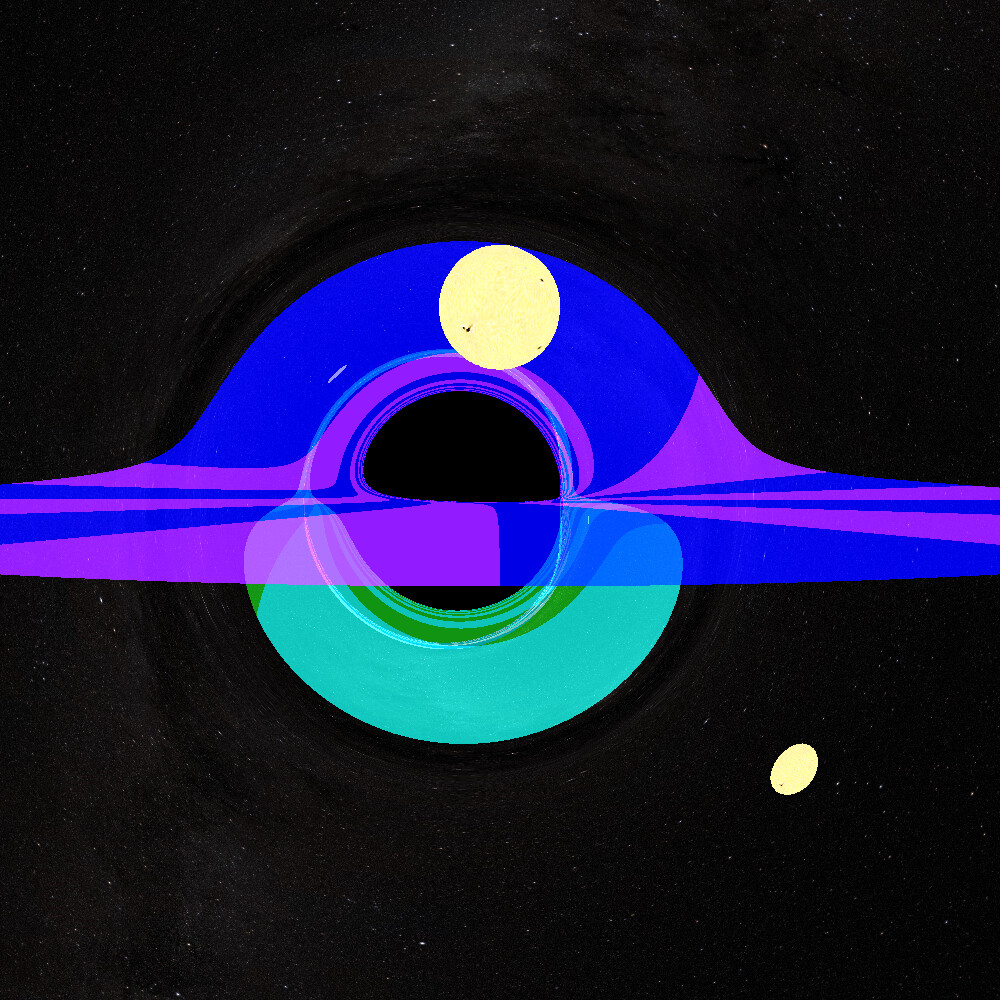
Accretion disk
The ray tracer supports an accretion disk that is either textured or plain-colored. It also supports multiple disks, at arbitrary radii from the event horizon, albeit restricted to the horizontal plane around the black hole. The collision point of the ray with the disk is calculated by performing a binary search for the exact intersection. If we don’t search for the precise point of intersection, we would see artifacts due to the “resolution” of the steps taken by each ray (notice the jagged edges at the bottom of the disk):
Once the intersection search is implemented, the lines and borders become nice and crisp:
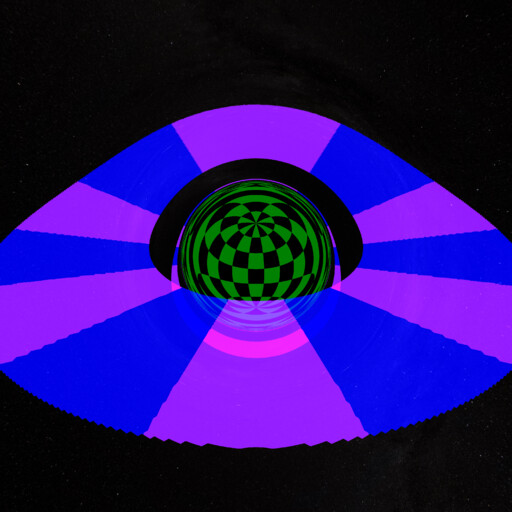
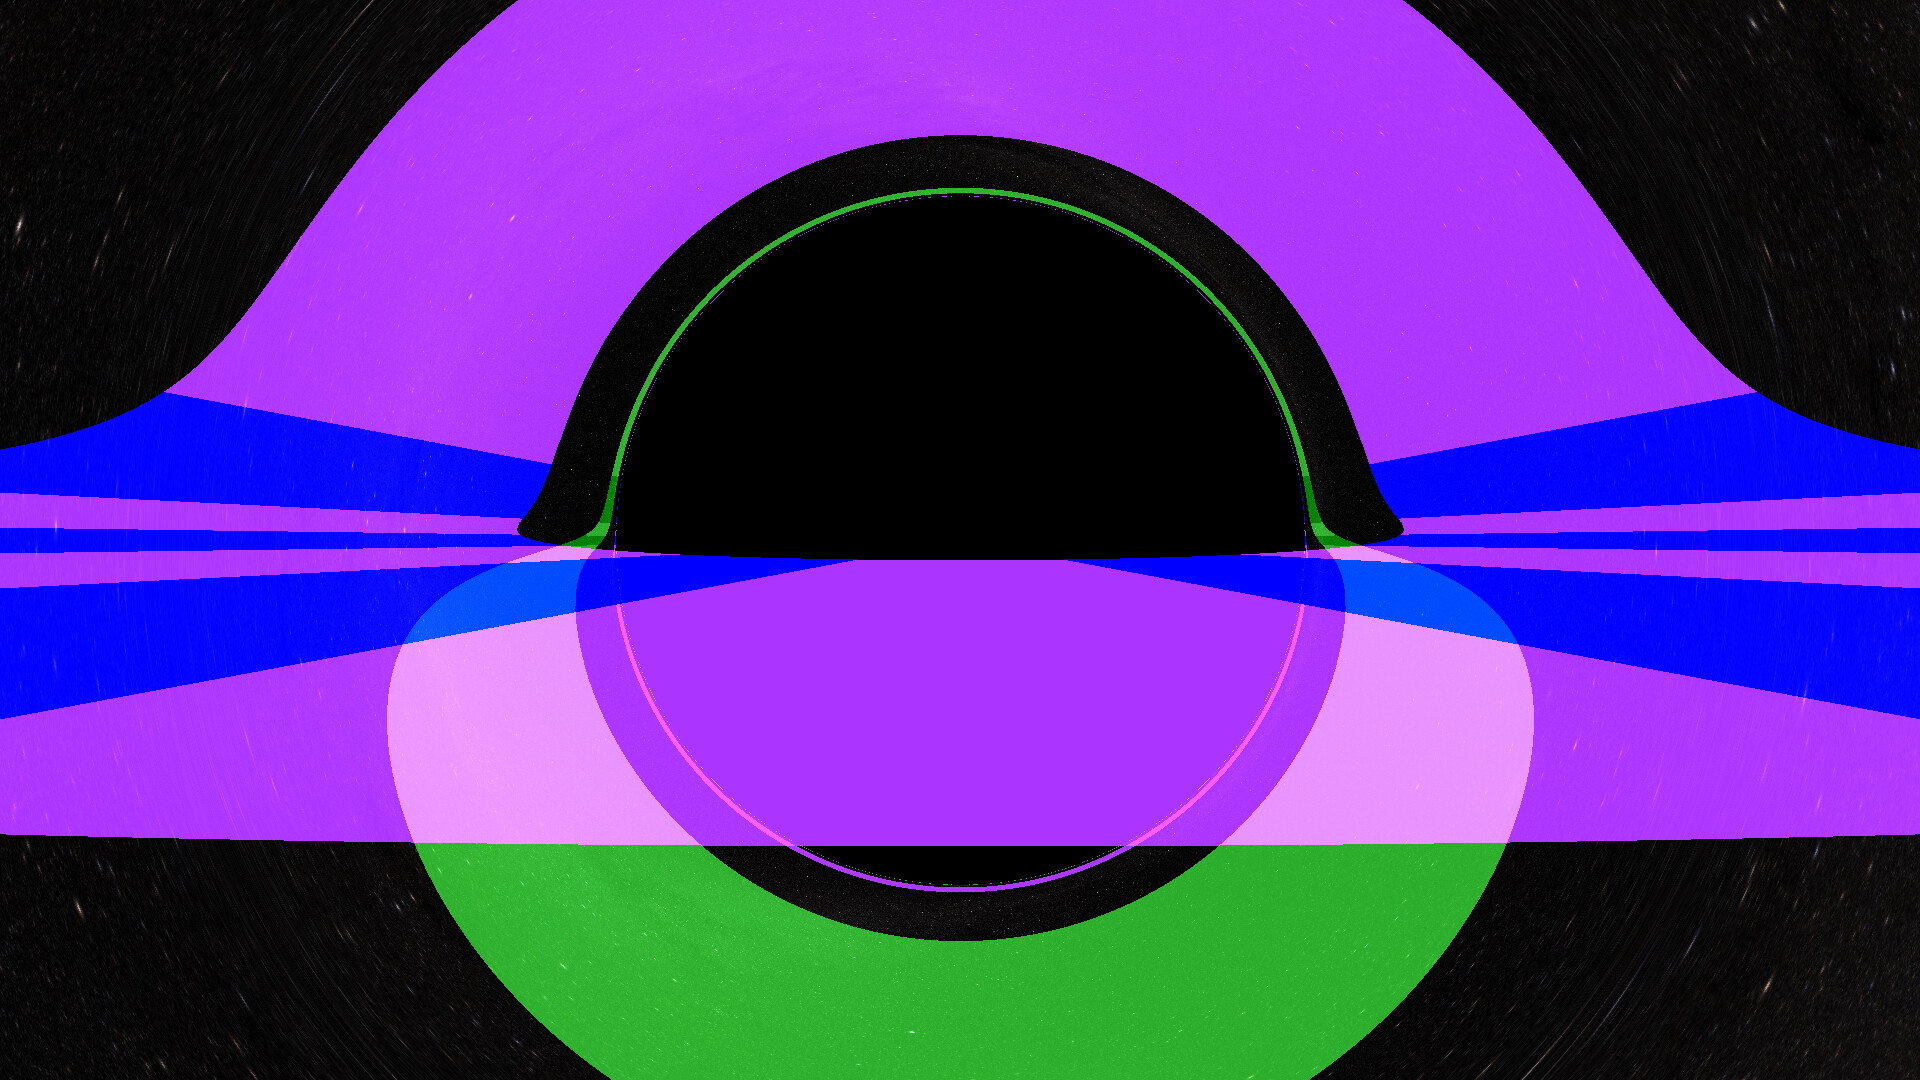
We can also apply different colors to the top and bottom of the disk. Observe that the black hole distorts the disk in a way that makes the bottom (colored in green) appear around the lower semicircle of the photon sphere, even though we’re looking at the disk from above:
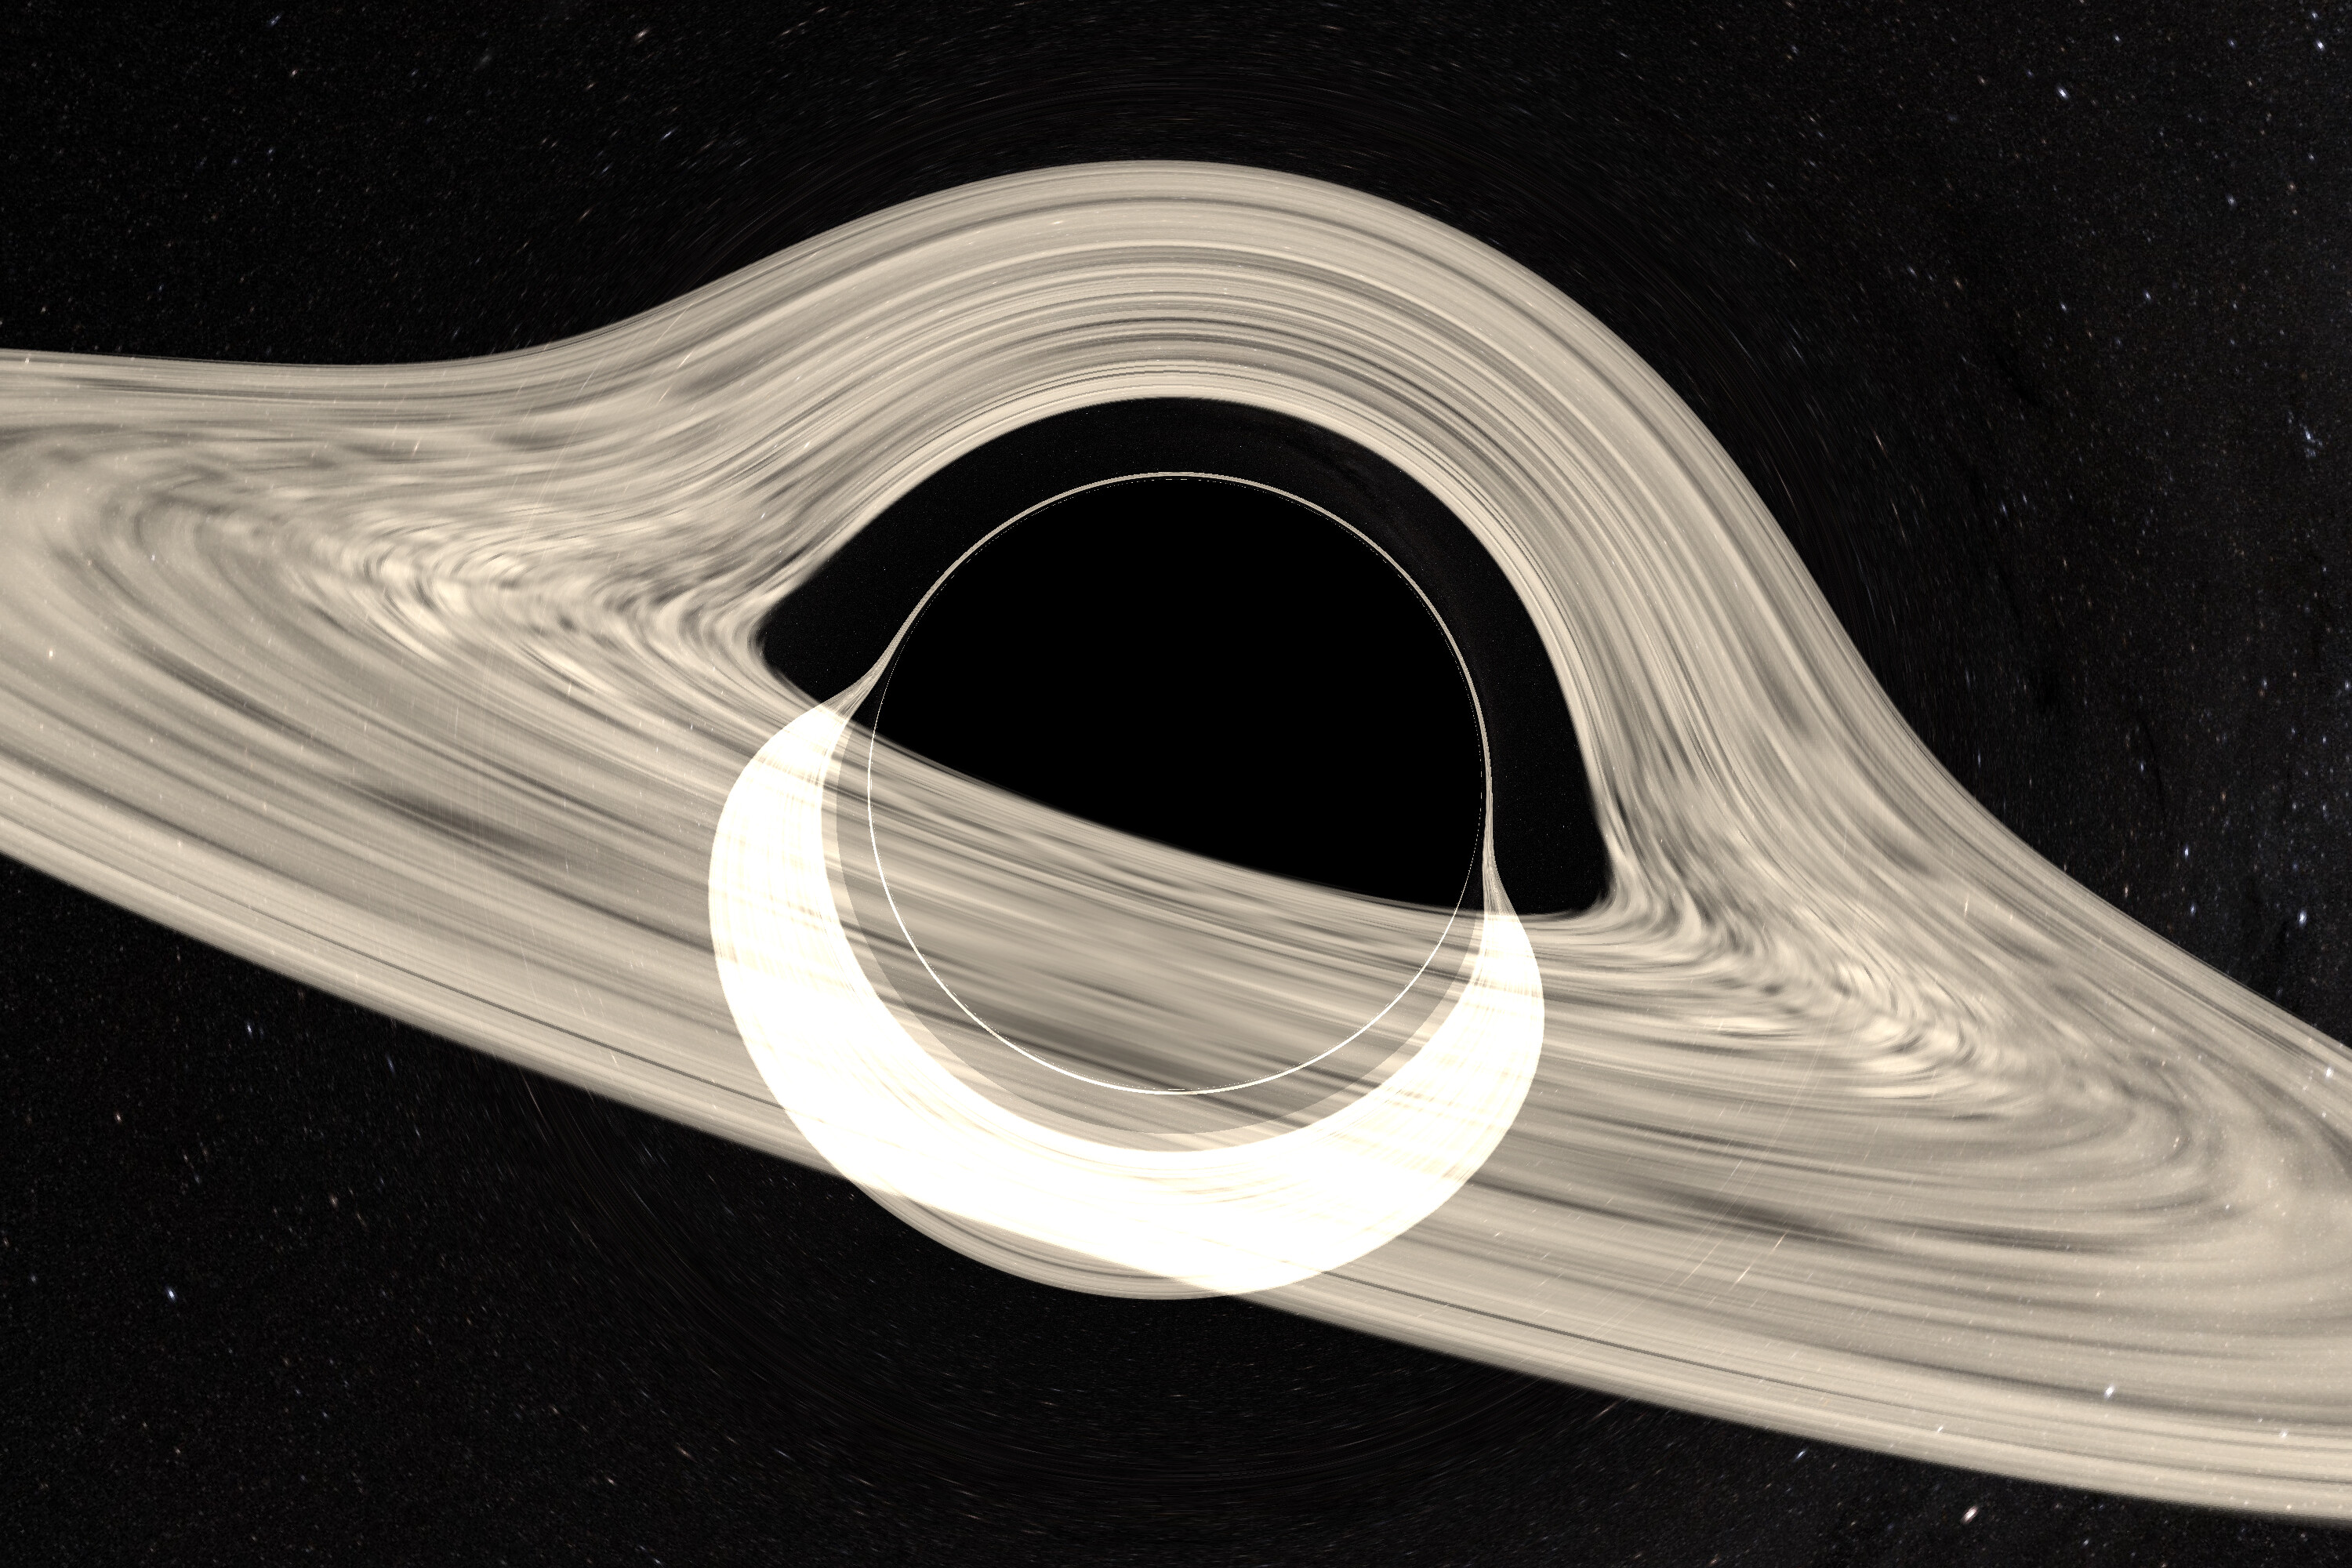
Note that the dark black circle is not the event horizon, but is actually the photon sphere. This is because photons that cross into the photon sphere from the outside cannot escape. (Only photons that are emitted outward from inside the photon sphere can be seen by an outside observer.)
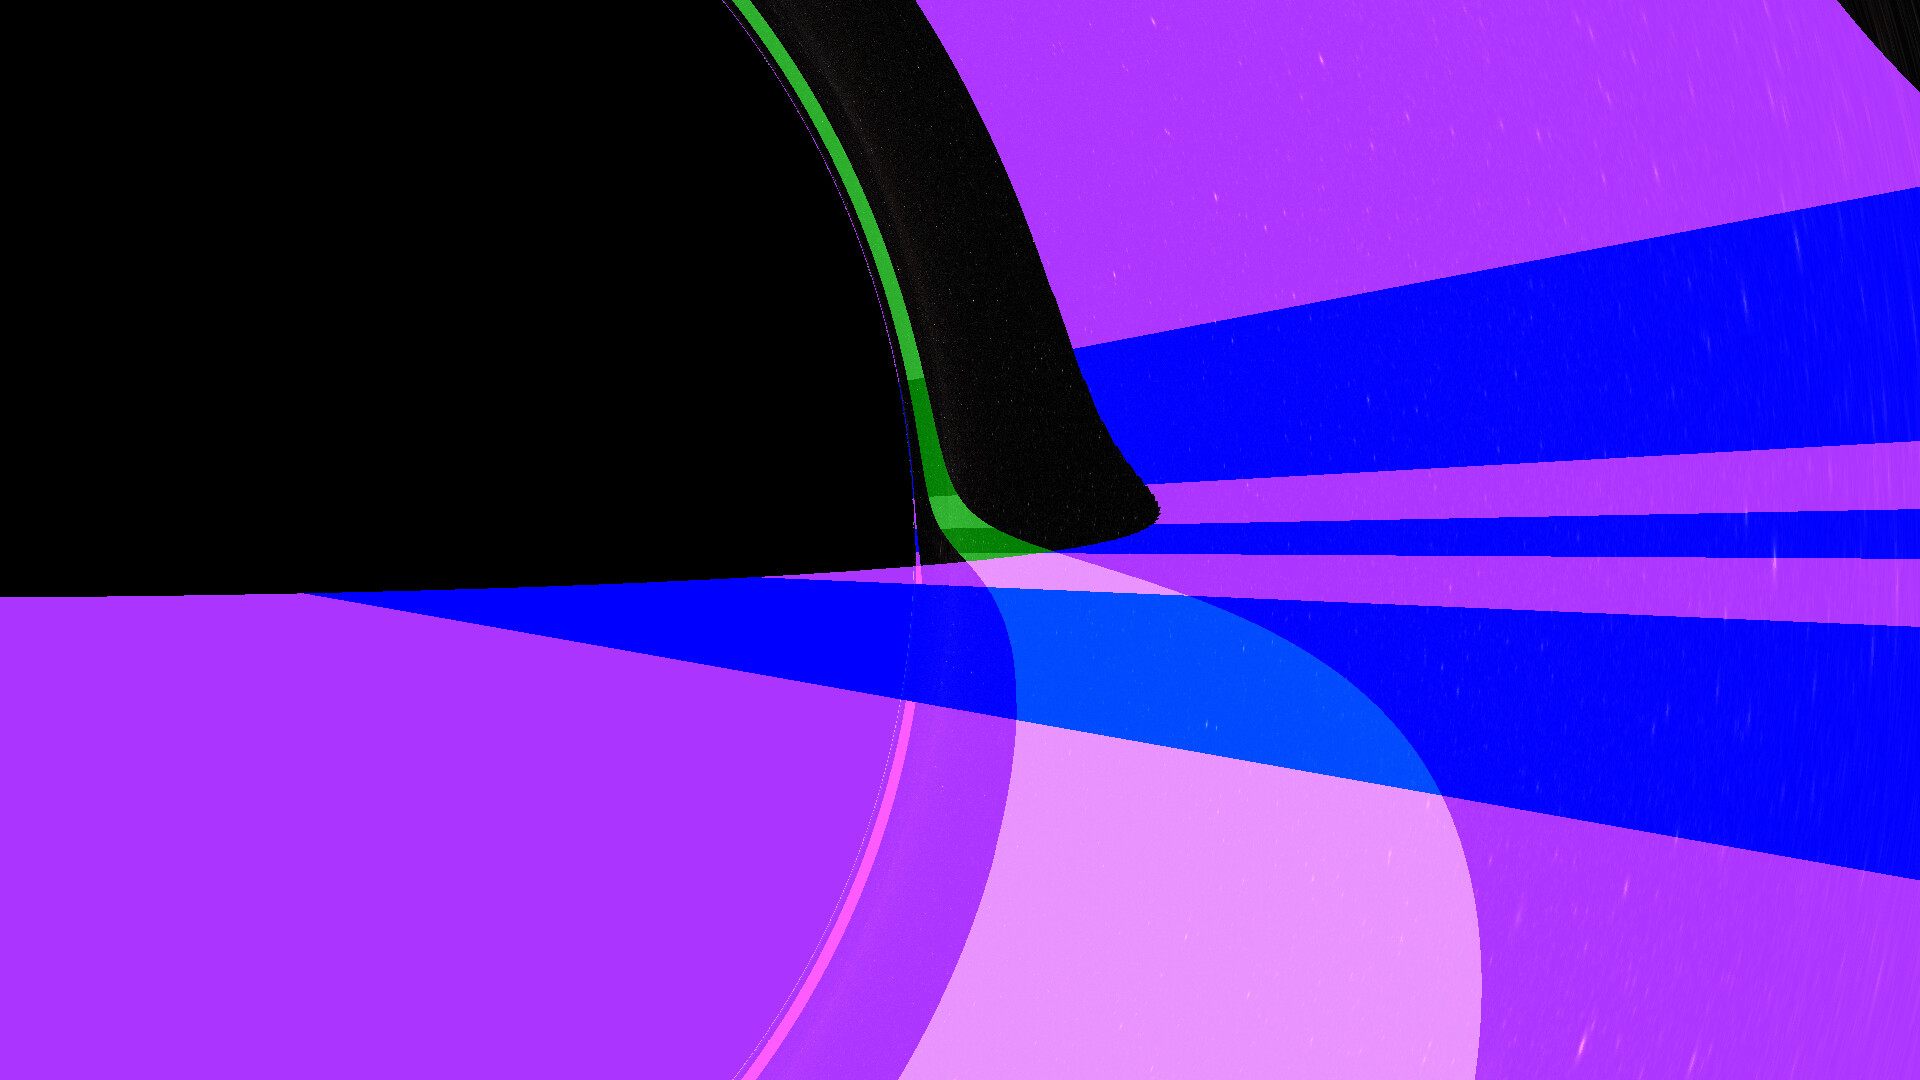
If we zoom in on the right edge of the photon sphere, we can see higher-order images of the disk appear around the sphere (second- and even third-order images are visible). These are rays of light that have circled around the photon sphere one or more times, and eventually escaped back to the observer.
And here is the same image with a more realistic-looking accretion disk:
Great! Now that we have the basics out of the way, it’s time to get a little more crazy with ray tracing arbitrary materials around the black hole.
Additional spheres
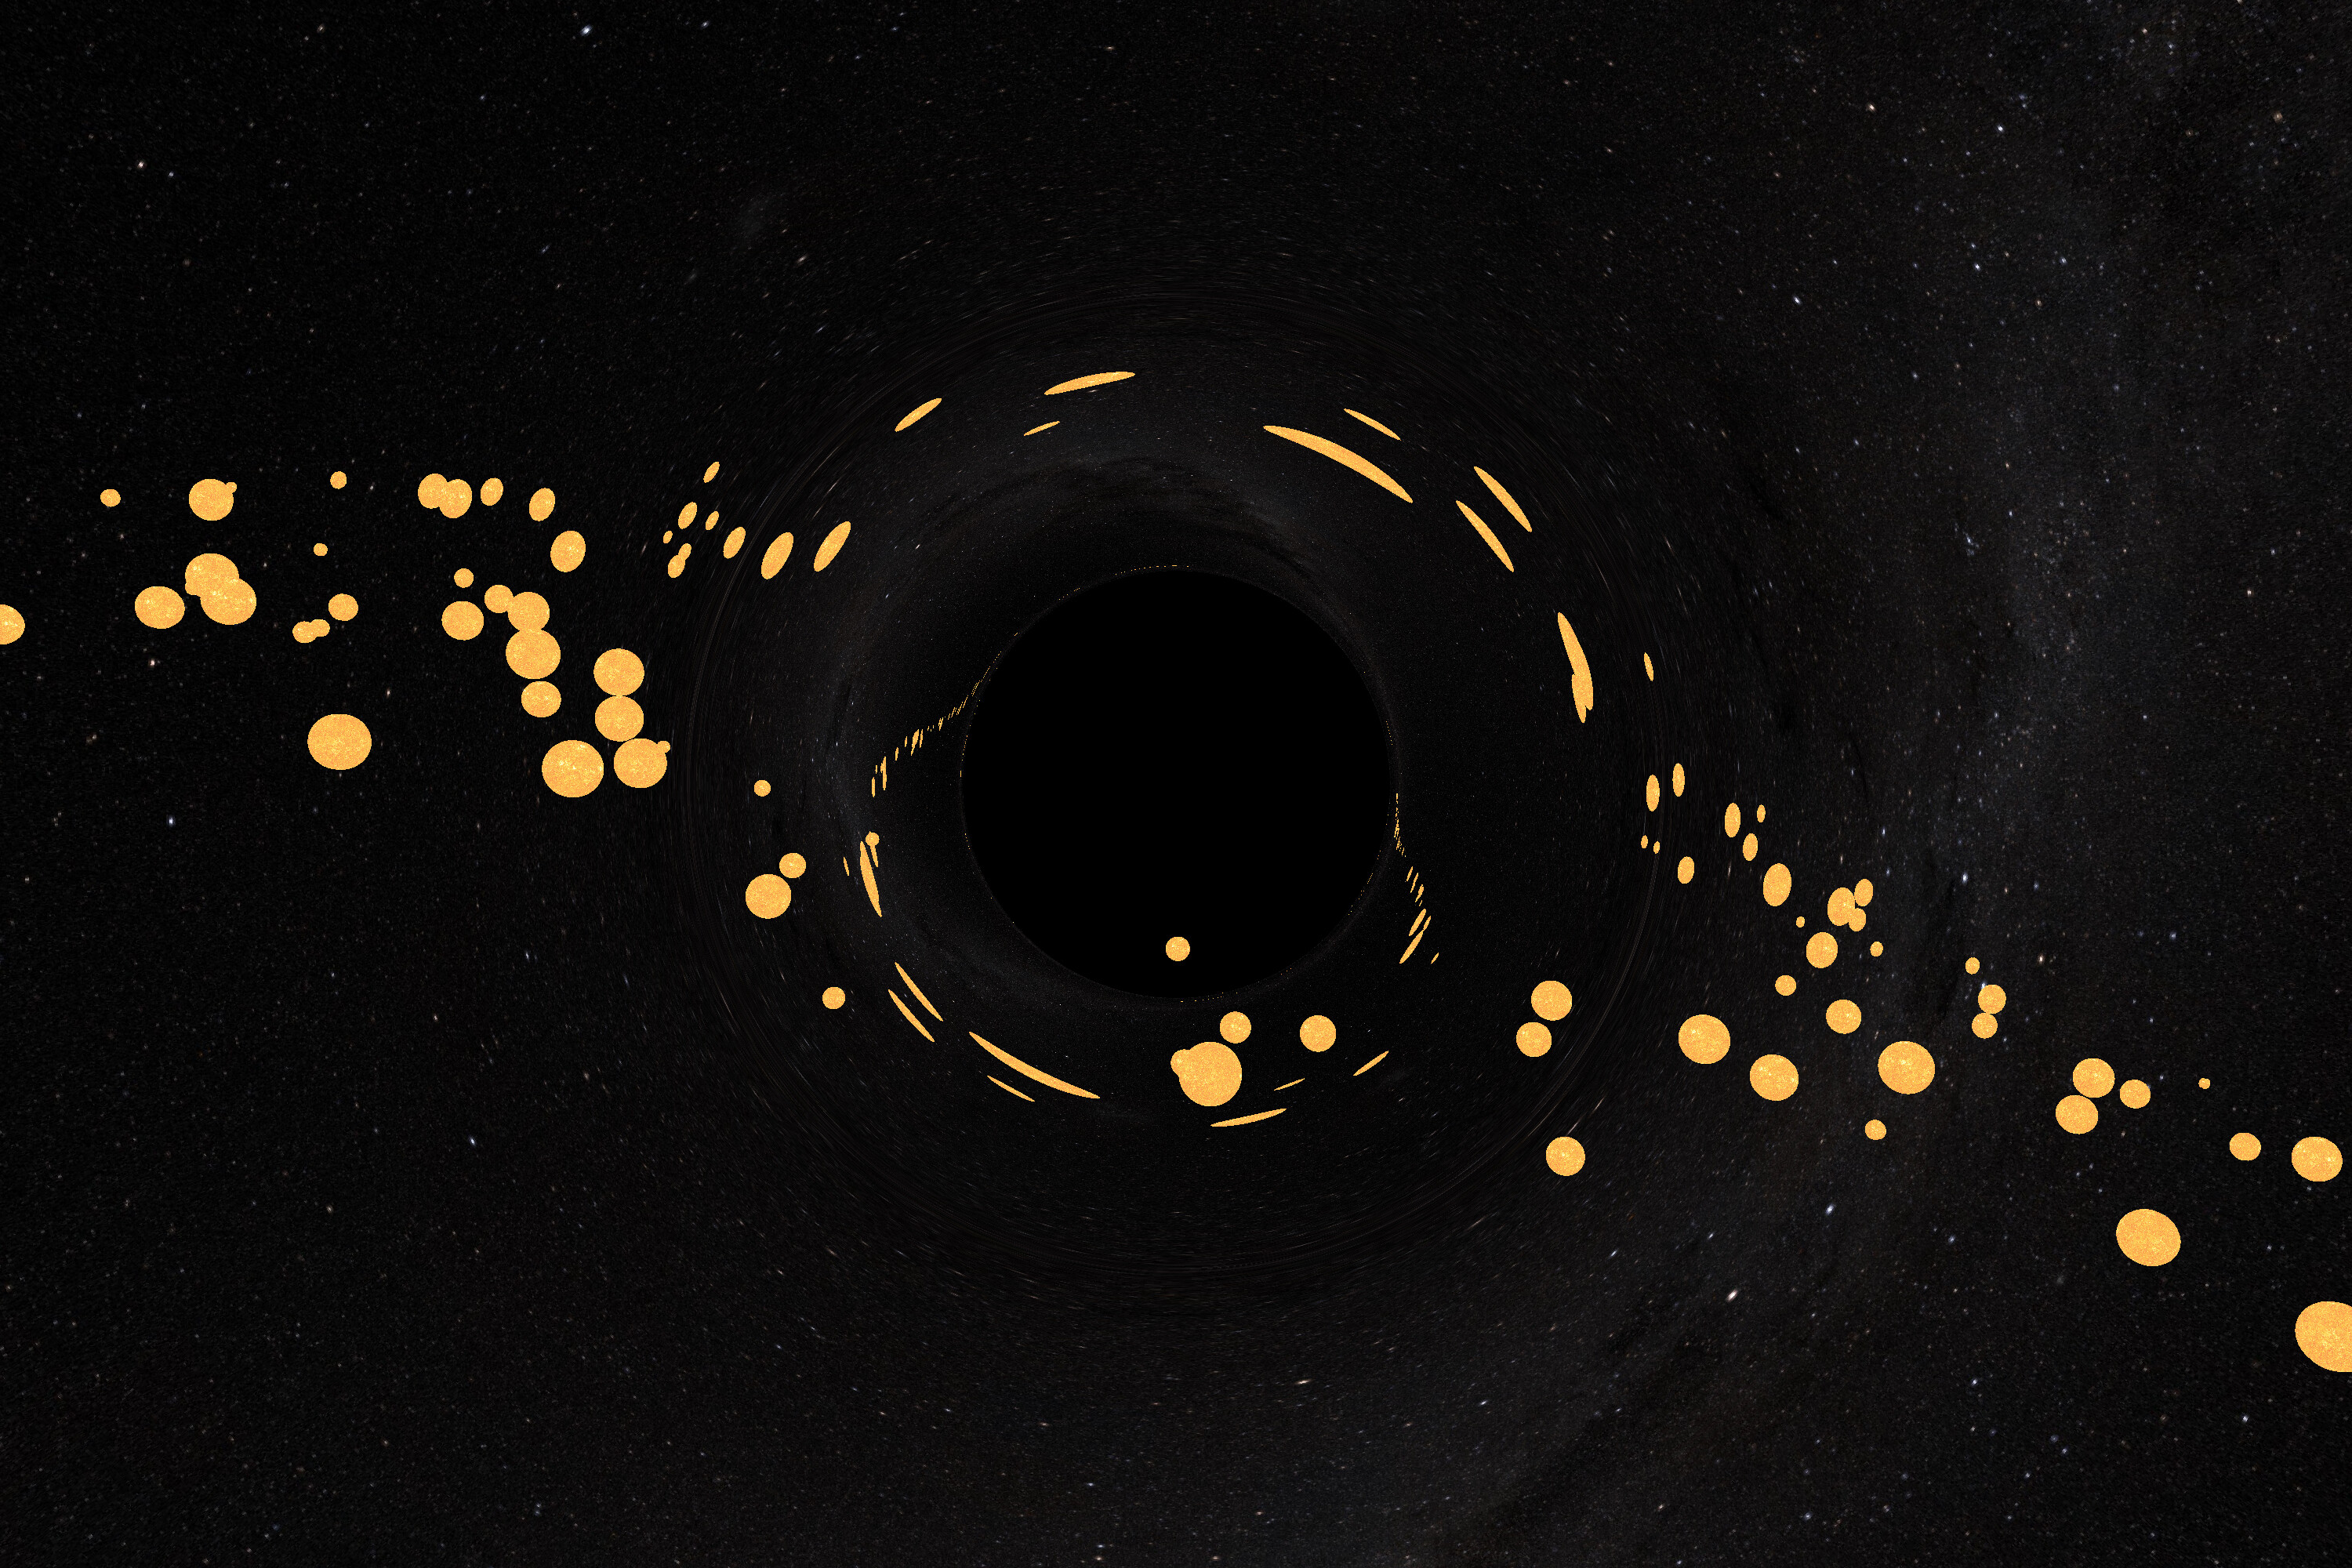
The ray tracer allows adding an unlimited number of spheres, positioned anywhere (outside the event horizon, that is!) and either textured or plain-colored. Here is a scene with one hundred “stars” randomly positioned in an “orbit” around the black hole (click to view larger versions of the images):
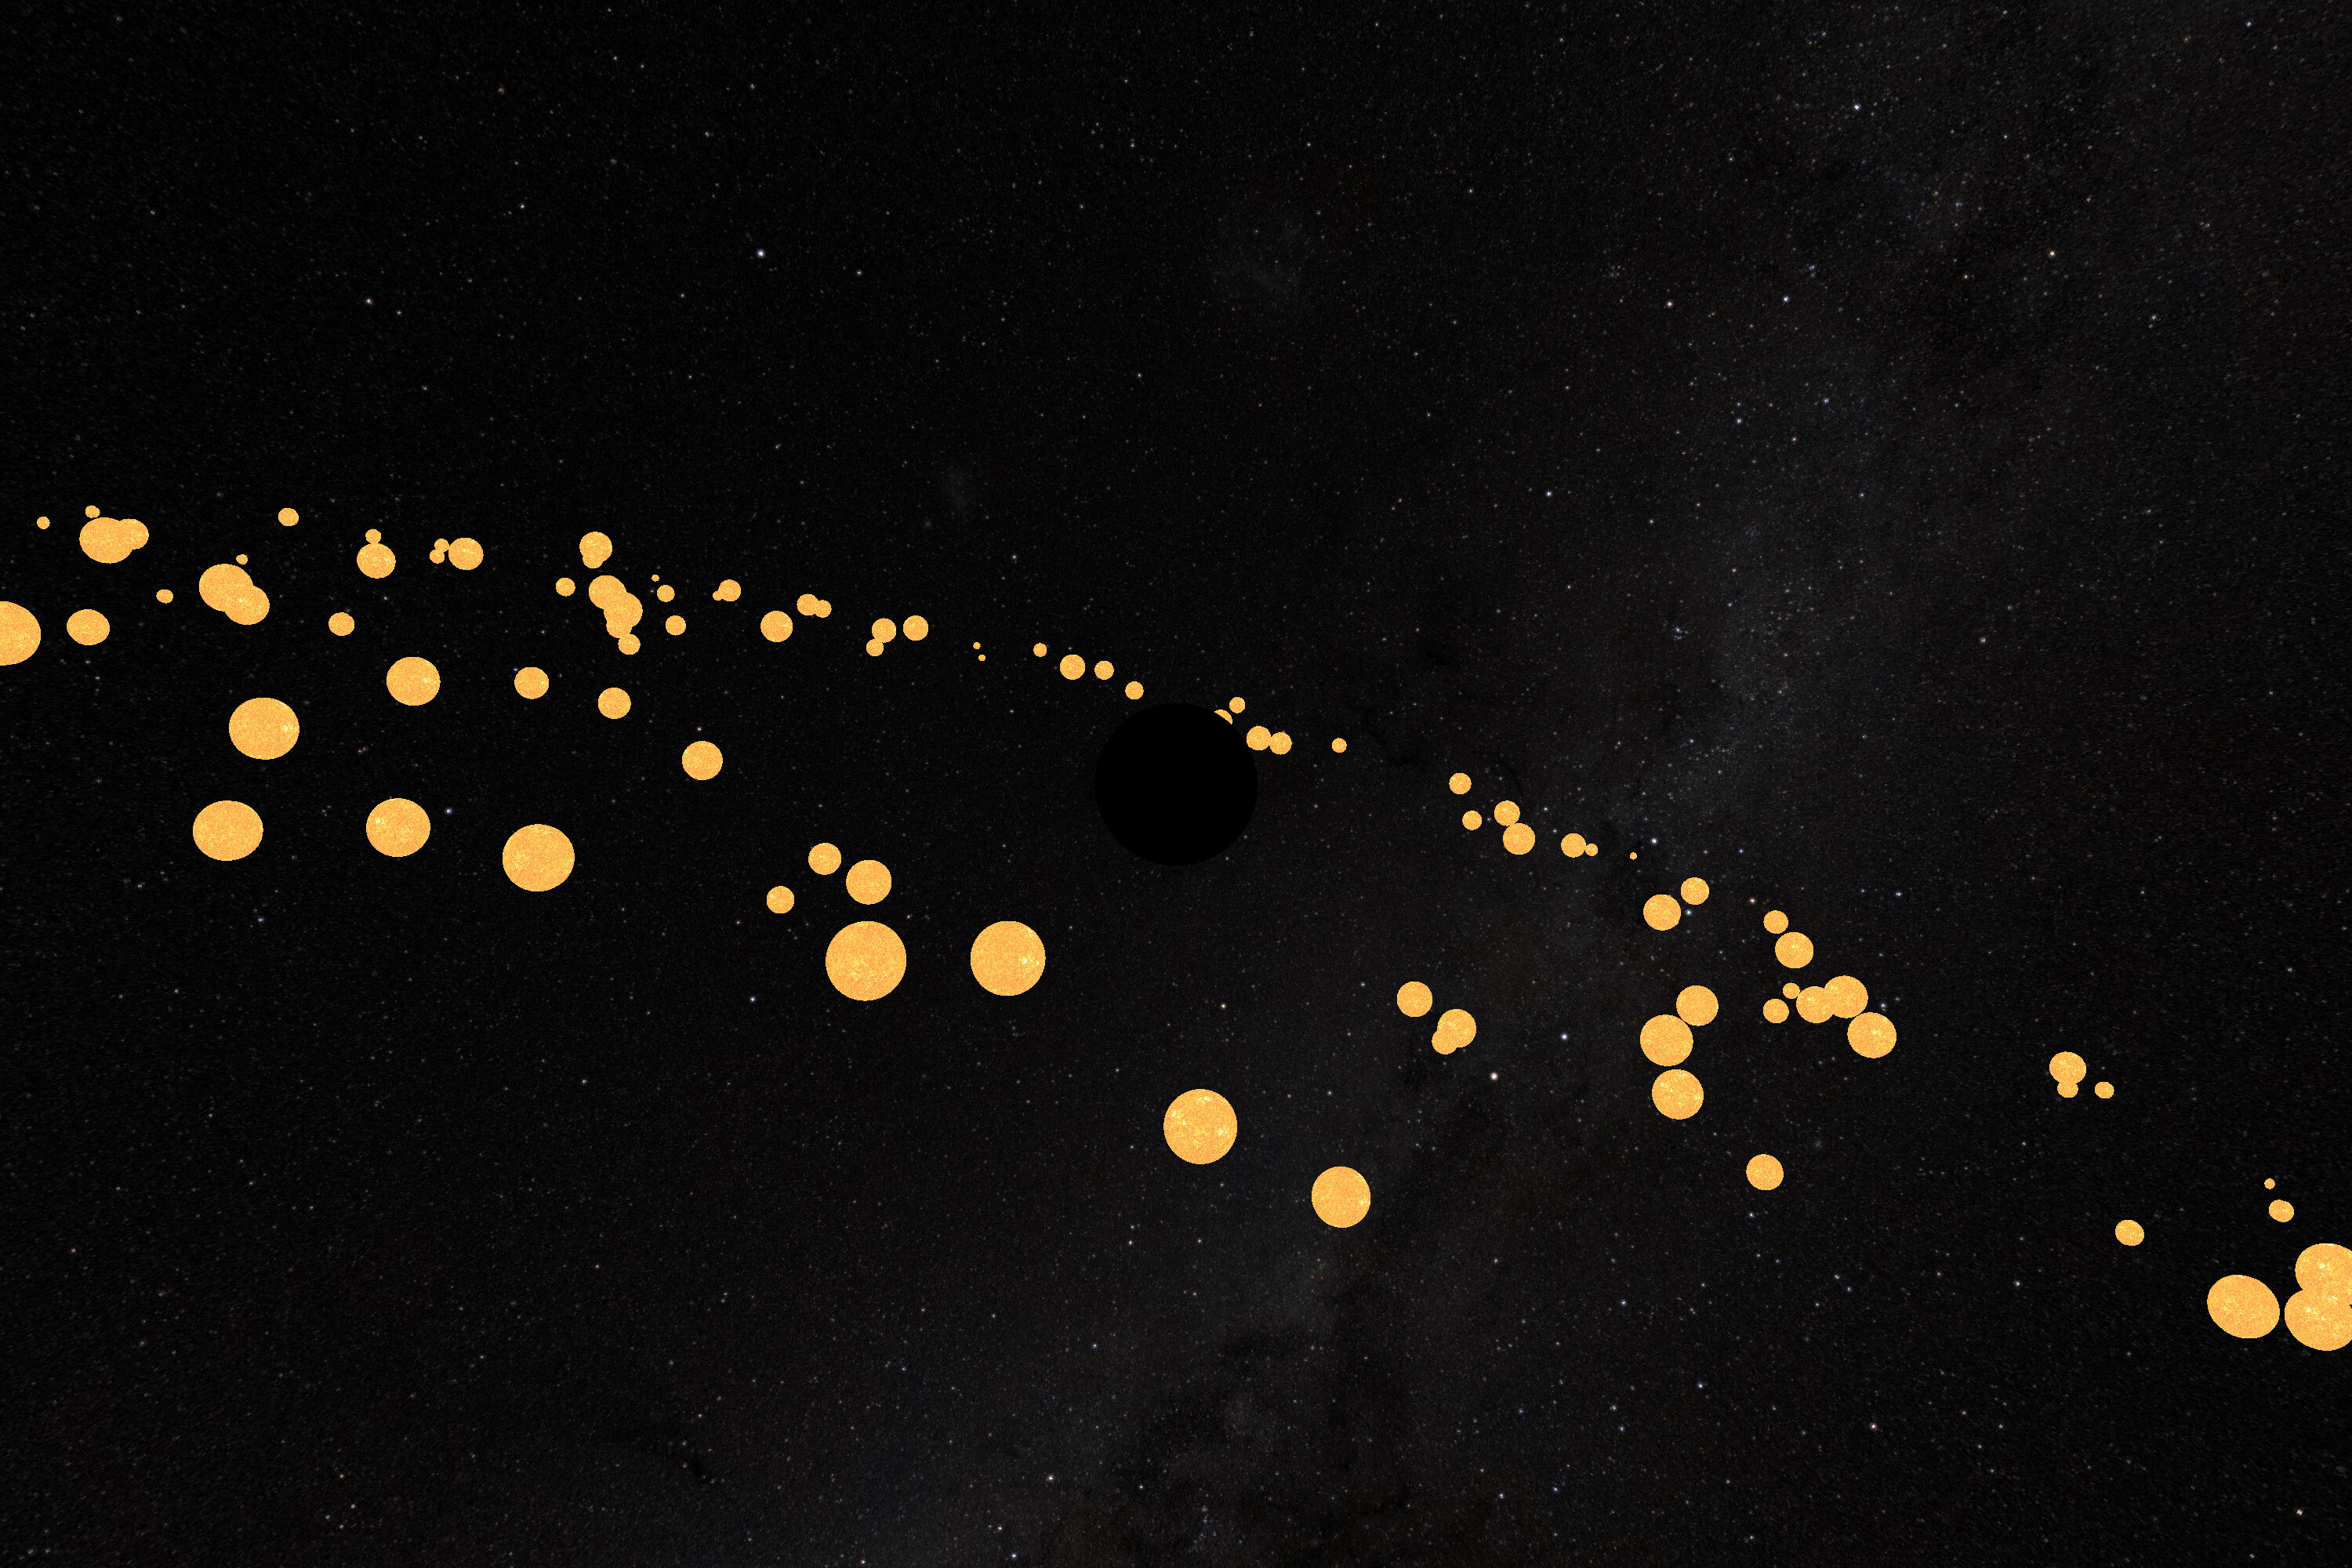
Notice once again how we can see second- and third-order images of the spheres as we get closer to the photon sphere. By the way, here is a similar image of stars around the black hole, but with the curvature effects turned off (as if the black hole did not curve the surrounding space):
And here is a video, generated using the ray tracer, that shows the observer circling around the black hole with stars in its vicinity. Once again, this is not a completely realistic physical picture, since the stars are not really “orbiting” around the black hole, but rather it’s a series of snapshots taken at different angles:
Notice how the spherical stars are distorted around the Einstein ring, as well as how the background sky is affected by the curvature.
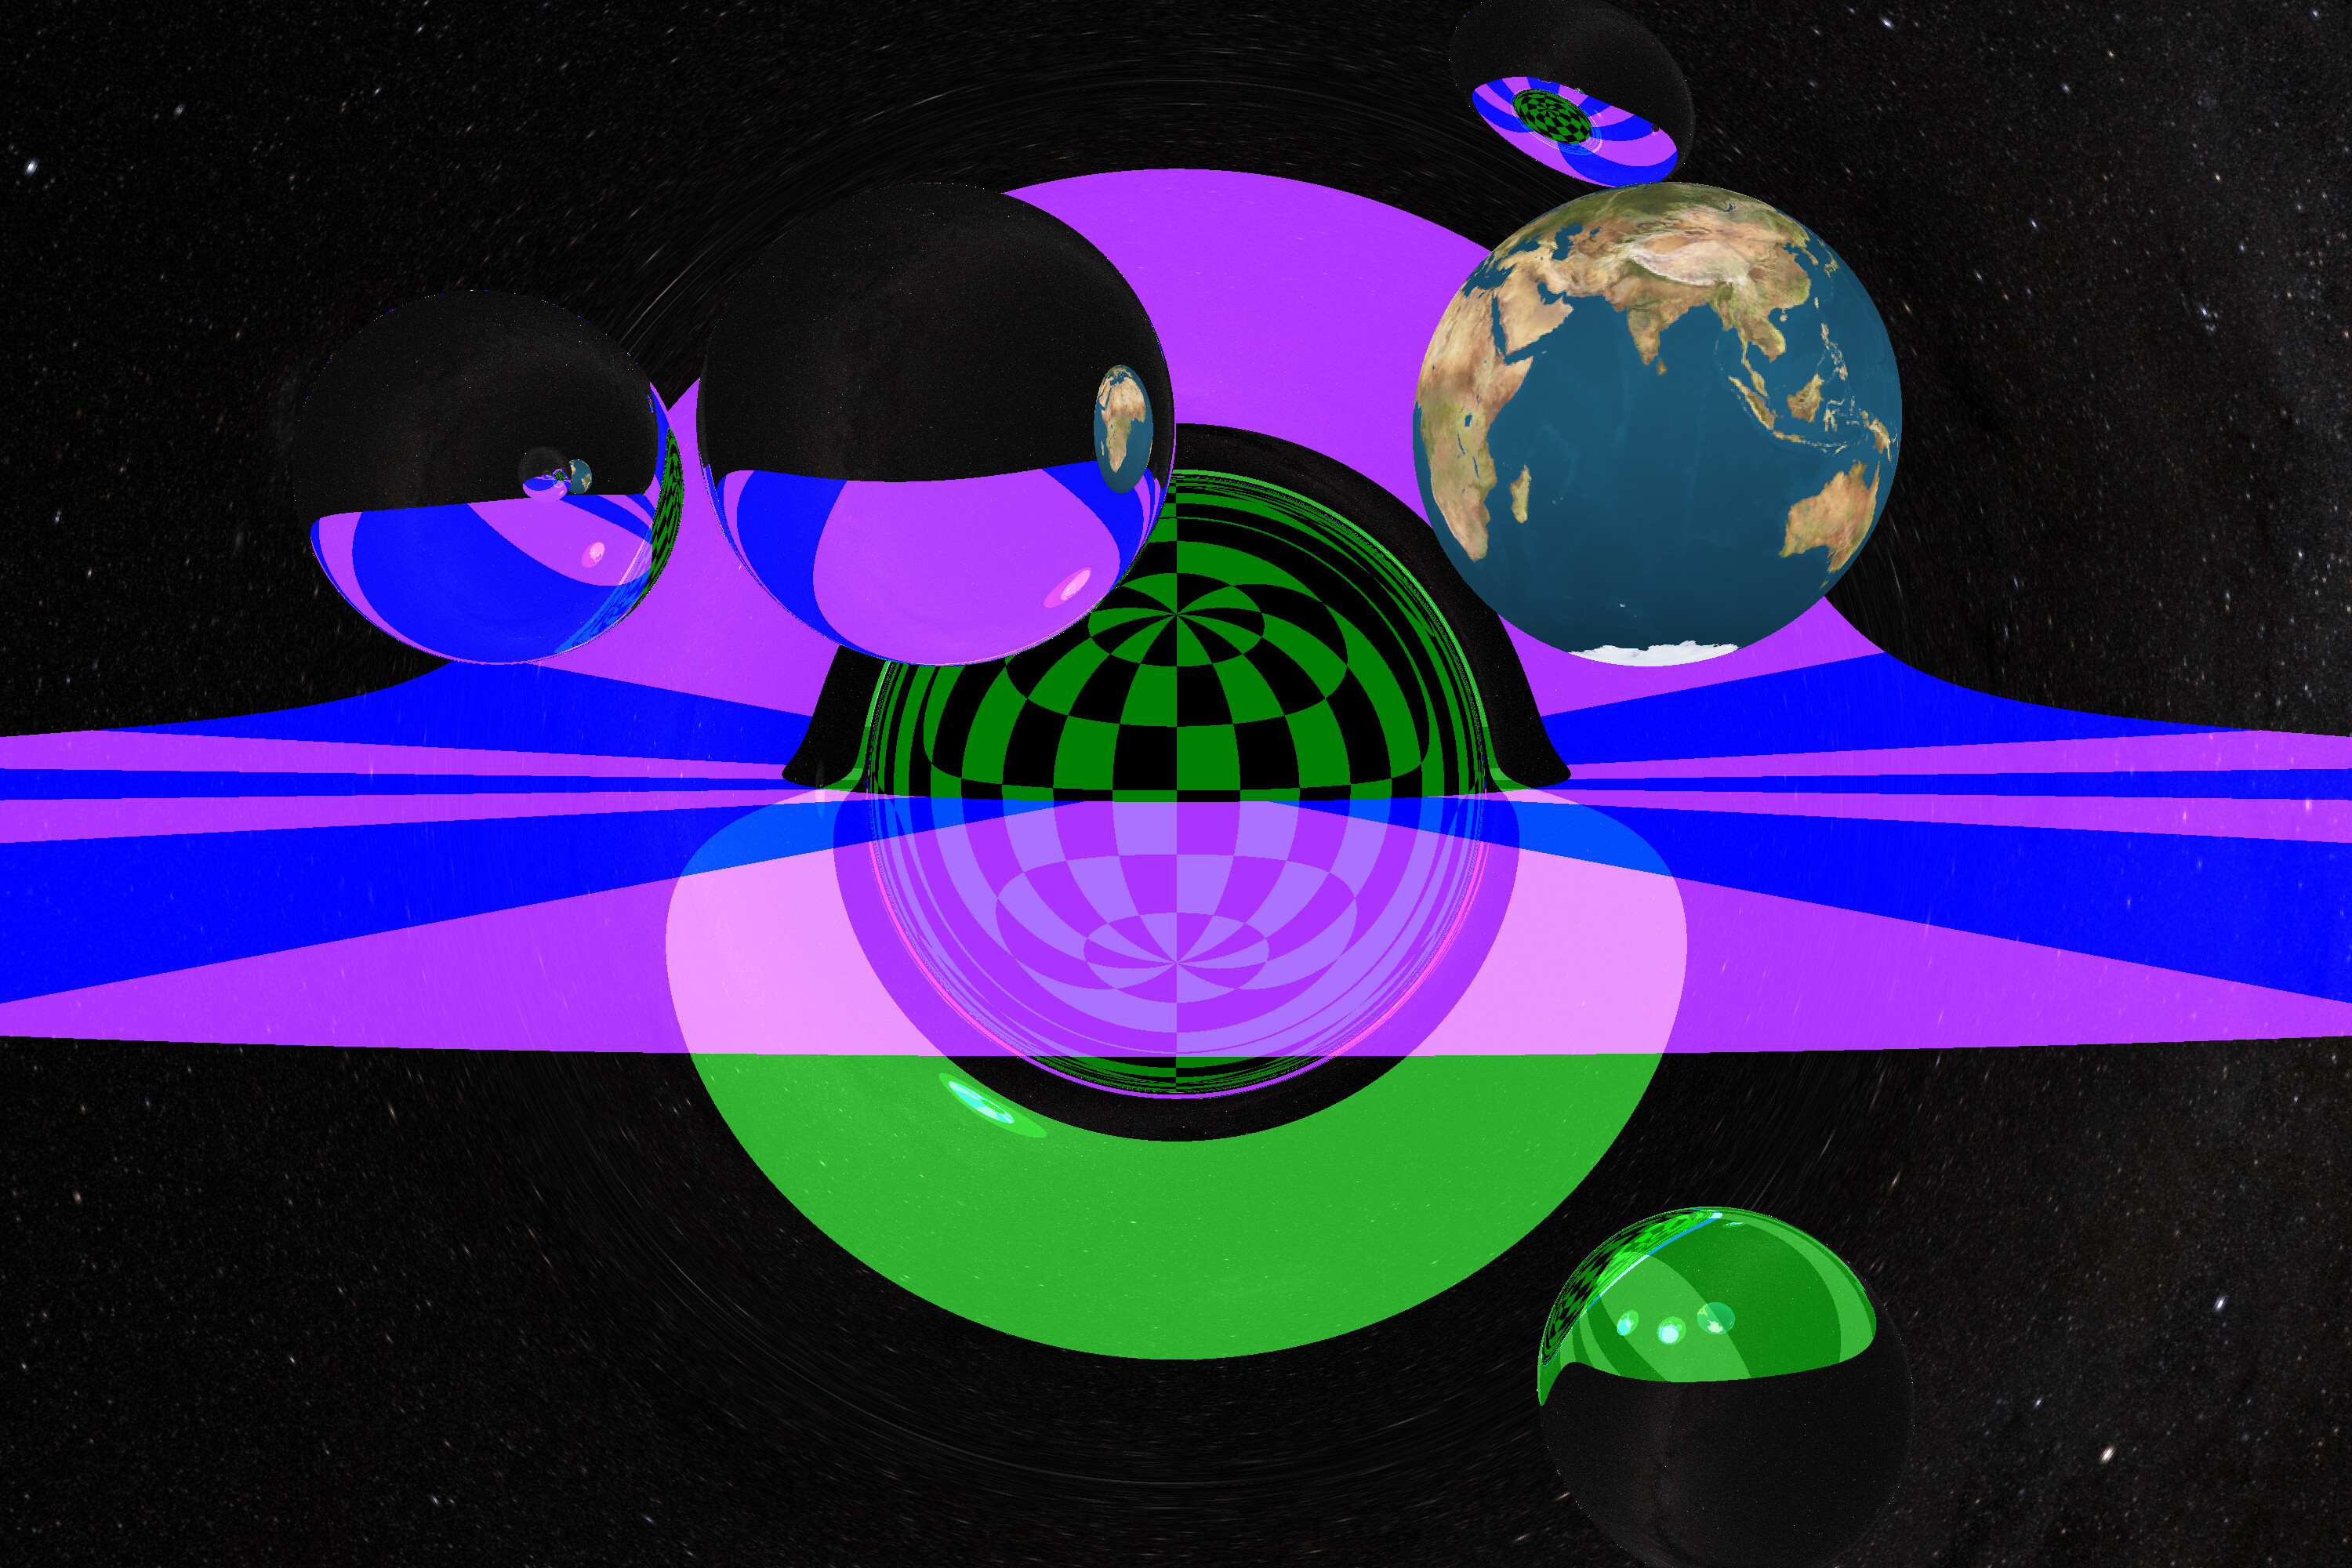
Reflective spheres
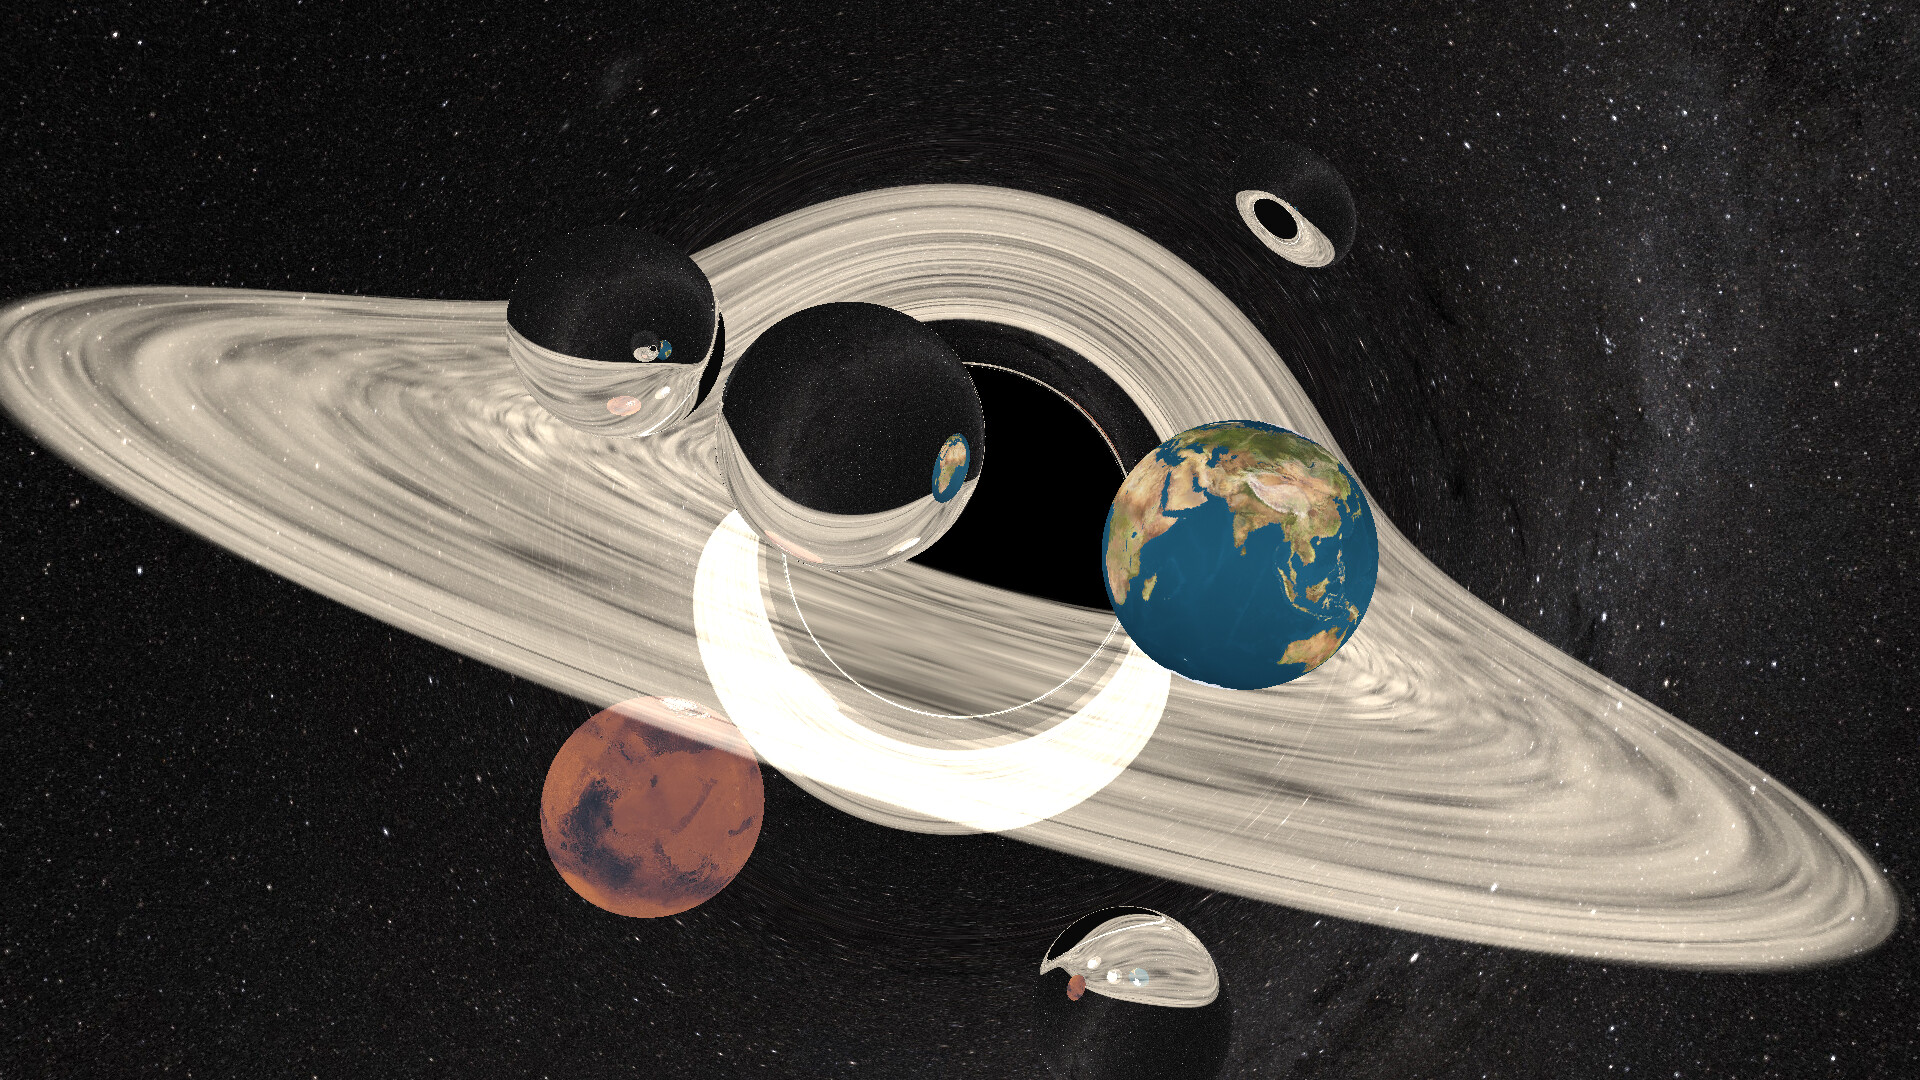
And finally, the ray tracer supports adding spheres that are perfectly reflective:
All that’s necessary for doing this is to calculate the exact point of impact by the ray on the sphere (again using a binary intersection search) and get the corresponding reflected velocity vector based on the normal vector on the sphere at that point. Here is a similar image, but with a textured accretion disk:
Future work
Eventually I’d like to incorporate more algorithms for different equations of motion for the rays. For example, someone else has encoded a similar algorithm for a Kerr black hole (i.e. a black hole with angular momentum), and there is even a port of it to C# already, which I was able to integrate into my ray tracer easily:
A couple more ideas:
There’s no reason the ray tracer couldn’t support different types of shapes besides spheres, or even arbitrary mesh models (e.g. STL files).
I’d also like to use this ray tracer to create some more animations or videos, but that will have to be the subject of a future post.
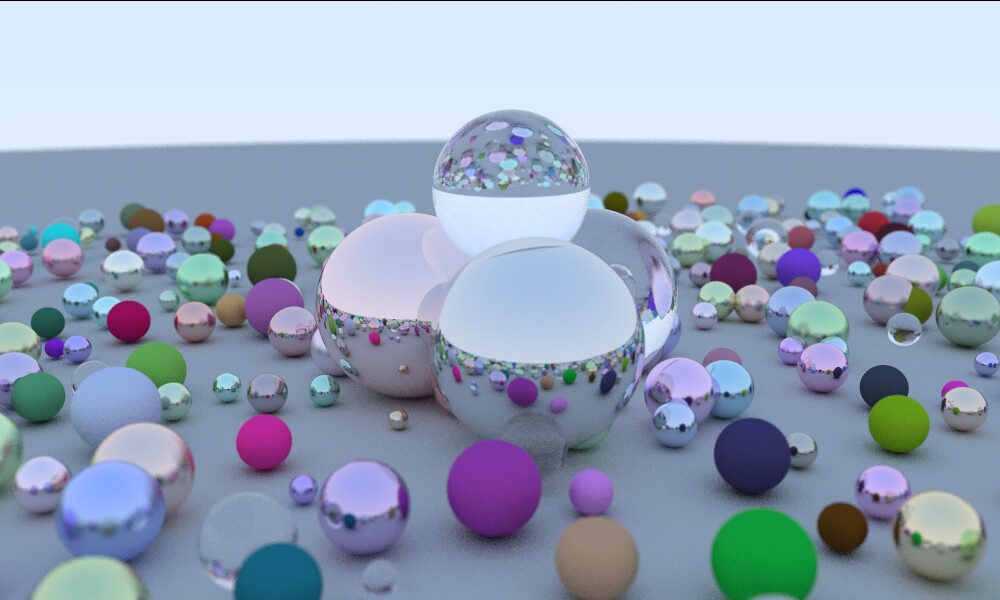
As a quick diversion, I recently followed Peter Shirley’s excellent Ray Tracing in One Weekend guide, which is a terrific refresher of the surprisingly simple math involved in ray tracing. And in the spirit of Atwood’s Law, I decided to do it in Javascript, since I don’t work with Javascript very often, and thought I could use a refresher in it, as well. The result is some relatively passable Javascript code (which is slow as hell!), but some really pretty pictures:
Some possible future work might be to create a renderer for black holes (in addition to regular spheres) which would actually curve the surrounding space and affect the direction of the rays. This would necessitate a radically more complex ray tracer, which would need to follow the path of the ray in a stepwise fashion using Boyer–Lindquist coordinates within the Kerr metric. Perhaps a project for another weekend (or two)!


 When I go running, I use my trusty