This is the first 10000 digits of e (the base of the natural logarithm), as interpreted by a spiral walk determined by each successive digit:
And here is a similar interpretation for γ (the Euler-Mascheroni constant):
This is the first 10000 digits of e (the base of the natural logarithm), as interpreted by a spiral walk determined by each successive digit:
And here is a similar interpretation for γ (the Euler-Mascheroni constant):
This is the first 10000 digits of π, as interpreted by a spiral walk, with each step of the walk determined by each digit. In other words, if the first digits are “3.1415…” then we walk up 3 pixels, then left 1 pixel, then down 4 pixels, then right 1 pixel, then up 5 pixels, and so on, while painting each step of the walk with a different random color.
My day-to-day work is focused mostly on Android and Windows development, so I often find myself a bit disconnected from web development. I thought I’d go through a few random exercises in JavaScript, and simultaneously bring some of my oldie-but-goodie projects “up to date,” as it were. A long time ago I made a Windows application that displays the Ulam prime number spiral, but there’s no reason it can’t be done in the browser today, so here we go:
The above picture is dynamically generated in your browser. Go ahead and interact with it: you can use your mouse scroll wheel to zoom in and out, and use the checkboxes to highlight certain special types of primes.
Recently I had another data recovery case that involved a comically large number of floppy disks, as in… more than five hundred (split evenly between 3.5” and 5.25” disks). We’re talking several large USPS boxes packed to the brim with floppies.
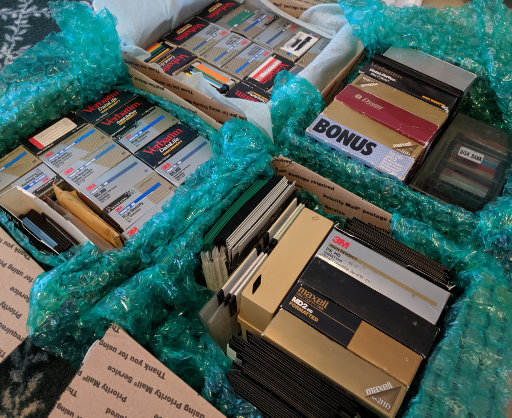
Of the numerous 3.5” floppies, only about 10% had one or more bad sectors, and none of them were completely unreadable. The same was true for the 5.25” floppies, even though some of them were physically bent or warped, to the point where I had to cut them open and transplant the disk itself into a new container. Some of the oldest files on these disks dated all the way back to 1986!
The recovery was performed using two older PCs, each of which have both 3.5” and 5.25” internal floppy drives, allowing the reading to be done somewhat in parallel.
There are actually plenty of cheapo floppy drives that connect over USB that can be purchased even now for as little as $15, but these drives are not, I repeat not suitable for recovering data from actual old floppy disks. They must be read by a proper original floppy drive, preferably from the same era as the disks themselves.
Anyway, when floppy disks were in widespread use in the 1980s and 1990s, they weren’t really intended or marketed as a long-term storage solution, but they’re proving to be quite resilient as time goes by. I’m not nearly as optimistic that today’s USB flash drives or SD cards will be readable in 30 years.
To be fair, these old disks have a much lower data density than modern storage media, so it makes sense that they would be more resilient to wear and tear. But still, it’s impressive that even what seems like mediocre-quality floppy disks still hold up to this day.
Despite these excellent outcomes, this still underscores how important it is to recover this data now, rather than waiting any longer and risking these disks developing any more bad sectors. So, let this be a call to action: if you have any old floppies lying around (or old tapes, Zip disks, Jaz disks, or anything else!), contact me for details on how to send them over, and I’ll recover the data from them for a fraction of the cost of other companies.
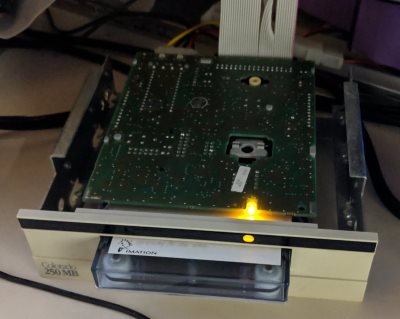
I’ve got another recent data recovery job that is worth mentioning! (Quick reminder: I offer a service to read data from super-old media such as tapes and floppies) This particular client had a number of QIC-80 tapes from the mid-1990s that contained backups of a desktop workstation.
To read QIC-80 tapes, I have an ancient Colorado 250MB drive which I acquired a while ago, but here’s the problem: this drive connects to the floppy disk controller on the motherboard, which means that it must need very specific drivers or software to communicate with the drive.
In Linux, the way to communicate with such drives is using the ftape driver, which used to be included with the Linux kernel. However, ftape was removed from the kernel in 2006, citing too many bugs and too few users.
Since the tape’s label indicated that it came from a PC system, I decided to try keep it simple, and to recreate an actual DOS PC with this drive attached to the floppy controller. All I would need is to find the software that might communicate with this drive properly. After some serious dredging of old internet forums, I found a download site that contains the oldest versions of the Colorado backup software.
As I’ve done in the past, I used bochs to create a generously-sized disk image of 1 GB, and installed MS-DOS 6.22 onto it within the emulated environment of bochs. Then I copied over the installation files for the Colorado backup software. (I planned to do the actual installing of the Colorado software on the live PC instead of the emulated PC, since it might do some of the hardware detection during setup.)
Once the emulated disk image was complete, I wrote it onto a USB flash drive, plugged the drive into the old PC with the tape drive attached, and booted from the USB drive. (Thankfully the old PC has a very versatile motherboard that can boot from pretty much anything.)
The old PC booted successfully into MS-DOS, and I proceeded to set up the Colorado backup software. This did not present any issues, and the setup completed successfully without any non-default configuration.
When I ran the backup software, it went through a first-time setup process where the first sign of hope appeared: the software said that the tape drive was detected!

The next step was to rebuild the backup catalog from the tape, while praying that the catalog is compatible with this version of the backup software. And what do you know – the catalog rebuilt successfully, and I could see the directory tree of the backup. The final step is to perform the actual restoring of the files, which I did directly onto the current boot disk.
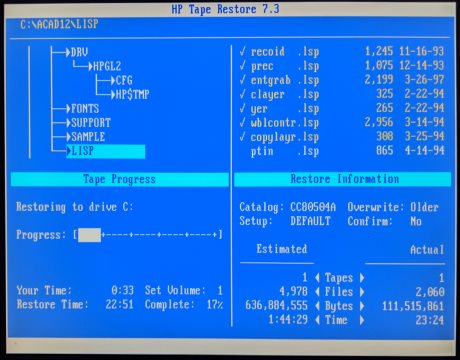
There was not a single hiccup during the actual reading of the tape. I continue to be amazed by the resiliency of tape backup media, as well as the durability of the drive hardware, which still works flawlessly after 25 years.
This tape was a full backup of a PC workstation in 1996, so the final “bonus” step is to boot into the backup within an emulated environment, and see this workstation running in all its glory: