Blog

A shot of nostalgia

I’m an avid appreciator of old (antique?) (vintage?) computers, and there’s nothing like the nostalgia that I get from occasionally stumbling upon an ancient computer (say, somebody’s old Commodore 64), and remembering a 10-year-old me learning to program in BASIC. That’s why, whenever I come across a really old computer, I’m compelled to tinker with it, and even try to turn in on, and see if it still functions.

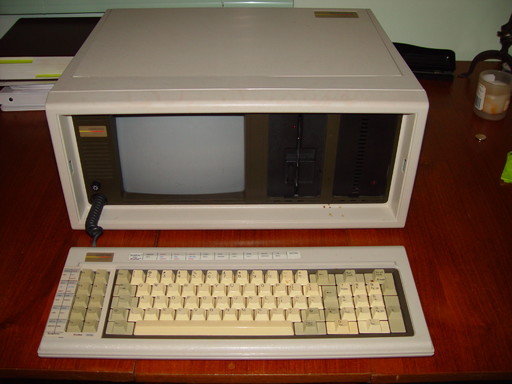
So, you can imagine my excitement when a friend of mine presented me with something that was lying around in his attic: an original Compaq Portable Plus!

Now I know how Jean-Luc Picard must have felt when he was presented with a Kurlan Naiskos. But nothing could have prepared me for what happened when I flipped the power switch after dusting it off: the computer booted up successfully without any hiccups, and landed me at the MS-DOS (2.0) prompt, in all its green-screen glory.

Let me mention just a few of the features that make this computer a must-have companion for the modern business professional (of 1983):

  • At an unbeatable price of $3,600, it’s affordable for any tech-savvy business pro, and will easily pay for itself in terms of the productivity boost you’ll get from using it.
  • Weighing in at just under 30 pounds, it’s perfect for all your on-the-go computing needs.
  • The generous built-in 9-inch monochrome CRT display keeps you focused on the task at hand, and the integrated CGA adapter allows you to connect to an external display, with an astounding resolution of 640×200, with 16 colors!
  • Powered by an Intel 8088 processor, at a whopping 4.77 MHz, this beast will blaze through any modern game or office application, making you the envy of all your friends and colleagues.
  • With 256KB of RAM (expandable to 640KB), it will handle all your most memory-intensive applications, and should be enough for anybody.
  • The built-in Parallel and Serial ports, as well as the versatile ISA expansion bus, allow you to connect your computer to all your essential peripherals. Why not splurge on a 1200-baud modem for calling up your favorite BBS while you’re on the go?
  • It goes without saying that the computer comes with a 5-1/4” floppy drive, compatible with single- and double-sided disks.
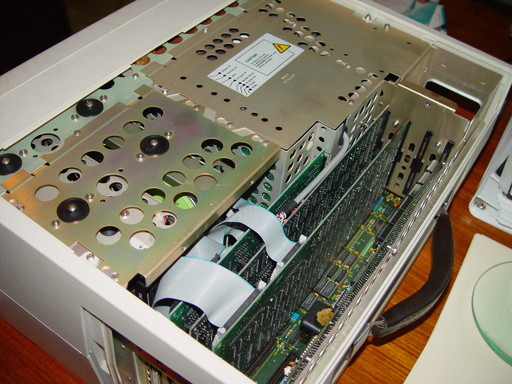
  • Best of all, the computer comes with a built-in 10MB hard drive, giving you an unprecedented amount of storage for all your files, without the fuss of floppy disks!

The verdict: an all-around winner!

A big update to DiskDigger for Android

I’ve just published some long-awaited updates for the DiskDigger app for Android! A lot of its low-level recovery logic has been updated, allowing it to provide you with all of this new functionality:

  • Recovered files can now be saved directly to Google Drive, Dropbox, and other cloud storage apps installed on your Android device.
  • Recovering files via email (Gmail, Yahoo mail, etc.) has been improved, with each file being a separate attachment in the email.
  • Lots of minor cosmetic enhancements for better compliance with Material Design guidelines.
  • Improved recovery of .MP4 videos and .ZIP files.
  • Added support for recovering .RAR archives.

So, wait no longer: get DiskDigger or DiskDigger Pro from the Google Play Store today! And don’t forget – DiskDigger for Windows remains an excellent choice for your recovery needs on your desktop PC, with more updates coming soon.

Mandelbrot in Android and C#

Recently I uploaded some old-ish code to GitHub for displaying the Mandelbrot set in Android and in C#. Creating an interactive Mandelbrot explorer application (with pan and zoom) is one of my favorite ways of learning to develop for an unfamiliar platform, since it exercises many of the facets that are common between all platforms, such as rudimentary GUI design (with touch gestures, if possible), basic graphics programming, and optimizing for performance. Although I’m no longer a novice in either Android or C#, this code might still be relevant today. I’ve also gone through and modernized some of it, so that it doesn’t look too embarrassing. Here’s the source code for the Android app, and the source code for the C# application for Windows Forms (.NET). Feel free to check it out and fork!

In the Android code, some emphasis is placed on using JNI, so that the Mandelbrot fractal is rendered in native code to maximize speed, and also uses the native Bitmap API to directly manipulate the bitmap pixels. The C# code, on the other hand, renders the fractal in pure C# (not native code), but it does also manipulate the bitmap pixels directly by marshalling the bitmap to an integer array. Both versions of the code make use of multiple threads.

The C# application also allows you to select the way that the Mandelbrot is calculated. By default it uses simple double-precision floating point, which allows the fastest calculation and therefore lets you maximize the number of iterations for your exploration of the fractal. However, you may also set the calculation to use GMP arbitrary-precision numbers which, while being much slower than double-precision, allow you to zoom into the fractal by any amount (although the calculation will become slower and slower as you zoom in).

(Note: the Android code is now available as an app on the Google Play Store!)

View 3D MPO photos with Google Cardboard

One thing that I’ve been meaning to get my hands on is Google Cardboard, which  is an extraordinary bit of technology that transforms your smartphone into a virtual reality display, for the cost of just a few dollars! I love the simplicity of the concept, and I especially like how it repurposes existing features of the mobile device, specifically how it uses the magnetic field sensor to implement a sliding magnetic button. Anyway, I bought mine from Unofficial Cardboard:

While familiarizing myself with the Cardboard SDK, I realized that a perfect application for Cardboard would be to view .MPO photos taken by 3D cameras. So I created a minimal Android app that automatically searches your device for .MPO files, and displays them for viewing with Cardboard!  You can find the app on the Google Play Store, and the source code on GitHub.

A few notes about the app:

  • It automatically searches your phone’s internal memory and external SD card, but only up to two folder levels deep. For best results, place the .MPO files in the root directory of the memory card.
  • It creates a slide show out of all the MPO files that it finds. You may advance through the slide show by using the magnetic Cardboard slider control. It does not currently allow any customization of the slide show (excluding/including files, custom ordering, etc). Stay tuned…

Experimenting with Google’s Project Tango

Recently I had the opportunity to play around with Project Tango from Google:

I whipped up a quick demo, based on the existing sample code from Google, that takes the real-time point cloud provided by the depth sensor and “records” it into a large buffer of points and displays all of it in real time (allowing you to move around a 3D area and record its geometry), and also allows you to save the point cloud to a file, for loading into an application such as Blender.

Here are some screenshots of the demo, after I used it to record the inside of my living room: