When you look at a folder full of pictures, and enable the display of thumbnails in your folders, Windows will show a thumbnail that represents each of the pictures. Creating these thumbnails is an expensive operation – the system needs to open each file, render the image in memory, and resize it to the desired size of the thumbnail. Therefore, Windows maintains a cache of thumbnails, saved in the following location: [User folder]\AppData\Local\Microsoft\Windows\Explorer.
A few years ago I published a utility for examining the thumbnail cache in Windows Vista and Windows 7. However, in Windows 8 and Windows 10, Microsoft seems to have made some slight modifications to the file format of the thumbnail cache which was preventing my utility from working properly. So, I revisited the thumbnail cache on the most recent version of Windows, and made sure the utility works correctly with it, as well as with all previous versions of the cache.
My updated ThumbCacheViewer supports thumbnail cache files from all versions of Windows after XP. It automatically detects cache files associated with the current user’s account, and it also allows you to explicitly open thumbnail cache files from any other location. Once the file is opened, the utility will show a simple list of all the images contained in the selected cache. If you select an individual image, it will also show some useful metadata about the image:
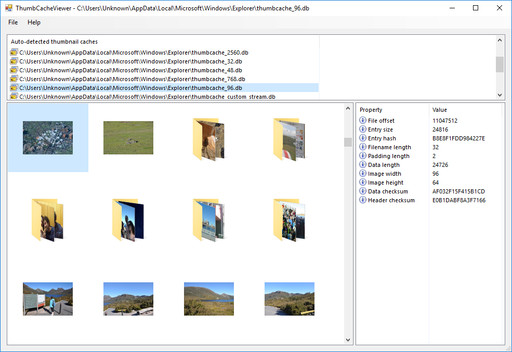
You can see that the cached images include thumbnails of individual photos, as well as thumbnail representations of folders that contain photos. Both of these can be forensically interesting, since the folder thumbnails still contain plenty of detail in the images. You can also see that there are separate caches for different resolutions of thumbnails, some of which are strikingly high-resolution (up to 2560 pixels wide, which almost defeats the purpose of a cache).
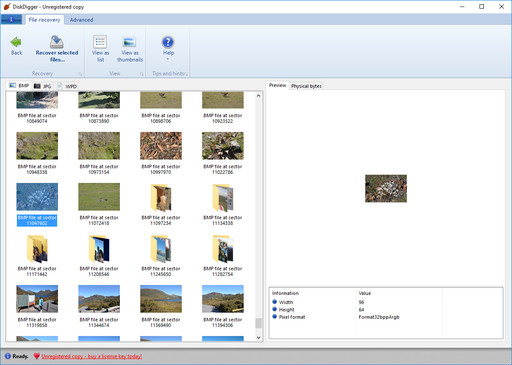
I’ll also point out that you can perform forensic analysis on thumbnail caches using DiskDigger, by opening the cache file as a disk image. You can do this by following these steps:
- Launch DiskDigger, and go to the “Advanced” tab in the drive selection screen.
- In the “Bytes per sector” field, enter “1”.
- Click the “Scan disk image” button, and find the thumbnail cache file that you want to scan.
- Select “Dig deeper” mode, and proceed with the scan.
Here is the same cache file as in the screenshot above, but viewed using DiskDigger (note the numerous .BMP images detected by the scan):
Either way, this is now a relatively complete solution for analyzing thumbnail cache files, whether you’re a professional forensics specialist, or a home user who’s interested in how Windows preserves thumbnails in more ways than you might think!