Minimalist programming, Android edition

Suppose you open Android Studio and create a new project from a template, say, a blank Activity with a button. Then build the project, and look at the APK file that is produced. You’ll notice that the APK is over 3 MB in size. These days we don’t bat an eye at these kinds of numbers, and indeed this size is pretty modest in the grand scheme of today’s software ecosystem. However, objectively speaking, 3 MB is a lot! Let’s take a deep dive into what these 3 MB actually consist of, and see how much we can reduce that size while maintaining the same functionality.

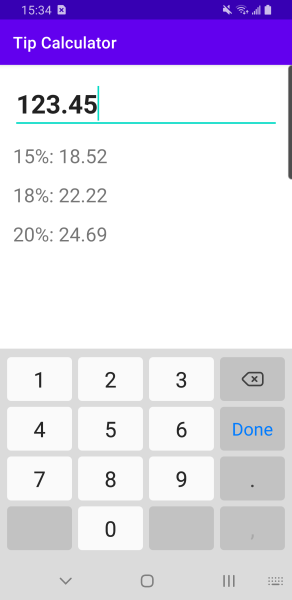
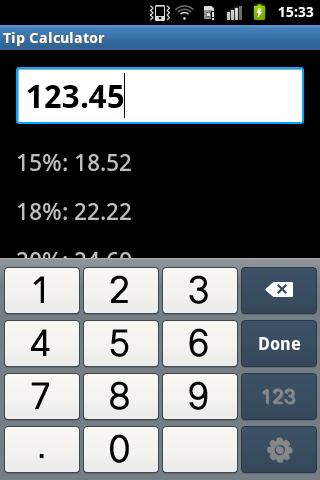
The app I’ve built for this exercise is slightly more complex than “hello world”; it’s an app that could actually be minimally useful: a simple tip calculator.

It’s literally a single input field (an EditText component) where the user enters a number, followed by a few lines of text that tell the user different percentages of that number — 15%, 18%, and 20%, which are the most common tipping percentages in the U.S.

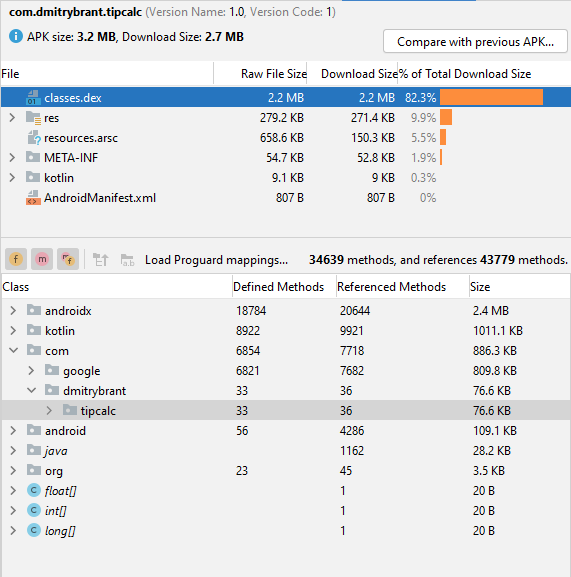
Once again, with the default project settings generated by Android Studio, this app comes out to about 3.2 MB when it’s built. Let’s examine the generated APK file and see what’s taking up all that space:

Right away we can see that the heaviest dependency by far is the AndroidX library, followed by the Kotlin standard library and the Material library (under the com.google package). In fact the code that actually belongs to our package (com.dmitrybrant.tipcalc) is a mere 76 KB, dwarfed by the library dependencies that it’s referencing.

To be fair it’s possible to reduce the size of the APK by a good amount by using the minifyEnabled directive, which is not enabled by default. In fact it would probably optimize away most of the “kotlin” dependency and much of the “androidx” dependency. However, even with minifyEnabled our APK size would still be on the order of megabytes. For the purpose of this exercise I left minifyEnabled off, so that we can see exactly which packages are contributing to the code sizes in our APK.

In any case, let’s start whittling away at this extra weight, and see how lean we can get.

The Kotlin tax

As we can see, merely using Kotlin in our app causes the Kotlin standard library to get bundled into the APK. If we don’t want this library to get bundled, we must no longer use Kotlin. (Although I’ll repeat that if we use minifyEnabled, then Kotlin would pretty much be optimized away, so this is more of an observation than a “tax.”)

After converting the code to plain Java and rebuilding the app, our APK is now 2.7 MB:

That’s a little better! But now can we remove the bulkiest dependency, namely the androidx library?

The AndroidX tax

AndroidX is a fabulous library that ensures your app will run consistently on a huge range of different devices (but not all of them!) and different versions of the Android OS. It makes perfect sense that AndroidX is used by default for new projects, and I’m not saying that you should reject it when building your next app. Buuuut… could we actually get away with not using it? How would our app look and run without it? And would our app still run on the same range of devices?

Getting rid of AndroidX means that our app will rely solely on the SDK libraries that are part of the operating system on the user’s device itself. To get rid of AndroidX in our project, we need to do the following:

  • Our Activity can no longer inherit from AppCompatActivity, and will now simply inherit from the standard Activity class from the SDK.
  • We can no longer use fancy things like ConstraintLayout, and will be limited to using basic components like LinearLayout.
  • Our theme definitions can no longer inherit from predefined Material themes. We will need to apply any color and style overrides ourselves.

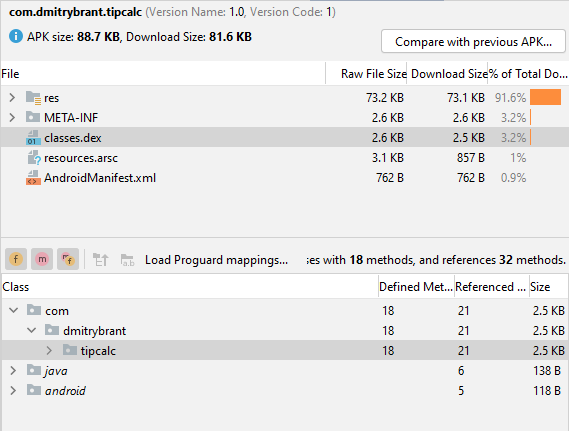
After these modifications are all done, here’s what our APK looks like:

That’s right, you’re not dreaming, the app is now 88 KB. That’s kilobytes! Now we’re getting somewhere. And if we look closely at those numbers, we see that the bulk of the size is now taken up by the resources that are bundled in the app. What are those resources, you ask?

Launcher icons

By default Android Studio generates a launcher icon for our app that takes several forms: a mipmap resource, which is a series of PNG files at different scales, which will be chosen by the launcher to match the pixel density and resolution of the device, and also a vector resource that will be used instead of the mipmap on newer devices (Android 8 and higher).

This is all very useful stuff if you need your launcher icon to appear pixel-perfect across all devices. But since our goal is minimalism, we can dispense with all of these things, and instead use just a single PNG file as our launcher icon. I created a 32×32 icon and saved it as a 4-bit PNG file, making it take up a total of 236 bytes. It doesn’t look perfect, but it gets the point across:

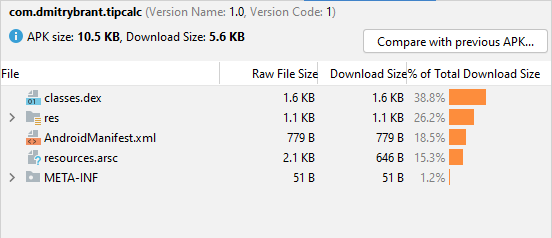
So, after getting rid of all that extraneous baggage, how are we looking now?

We’ve arrived at 10.5 KB! This is more like it. It may be possible to squeeze it down even further, but that would necessitate doing even more hacky and inconvenient things, such as removing all XML resources and creating layouts programmatically in our code. While I’m going for minimalism, I do still want the app to be straightforward to develop further, so I’m happy to make this a good stopping point.

This is definitely closer to the size that I would “expect” a tip calculator app for a mobile device to be. Speaking of mobile devices, which devices will this app be able to run on?

Compatibility

By default Android Studio sets our minimum SDK to 21, making our app compatible with Lollipop and above. There are plenty of good reasons to set your minimum SDK to 21, but now that we’ve removed our dependency on AndroidX, as well as our dependency on vector graphics, there’s nothing stopping us from reducing our minimum SDK even lower. How much lower? How about… 1? That’s right, we can set our minimum SDK version to 1. This would make our app compatible with literally every Android device ever made.

I don’t own any devices that actually run Android 1.0, but here is my Tip Calculator app running on the oldest device I own, a Samsung Galaxy Ace from 2011, running Android 2.3 (API 9):

And here is the same app running on my current personal phone in 2021, a Google Pixel 3 XL running Android 11 (API 30):

Takeaways

Aside from being an interesting random exercise, there’s a point I hope to convey here:

As time goes by, software seems to be getting more and more bloated. I believe this might be because developers aren’t always cognizant of the cost of the dependencies they’re using in their projects, whether it’s third-party libraries that provide some kind of convenience over standard functionality, or even the standard libraries of their chosen programming environment that the developer has gotten used to relying upon.

As with anything in life, there should be a balance here — a balance between convenience offered by libraries that might add bloat, and lower-level optimization and active reduction of bloat. However, it feels like this balance is currently not in a healthy place. The overwhelming emphasis seems to be on convenience and abstraction ad infinitum, and virtually no emphasis on stepping back and taking account of the costs that these conveniences incur.

Android is far from the worst offender in the world of bloat, and even though a 3 MB binary may be totally acceptable, it doesn’t have to be that way. Even though bulky standard libraries should be used in the majority of cases, they don’t need to be used all the time, and there may even be cases where the app would benefit from not using them. If only developers would maintain a better sense of how their dependencies are impacting the size of their apps, or indeed what dependencies they’re even using in the first place, we can begin to restore the balance of bloat in our lives.

The problem of recovering data from SSD drives

One frequent question I receive from users of DiskDigger is: Why does it seem to be unable to recover data from my internal SSD drive? And since SSDs have become nearly ubiquitous in laptops and desktops, this question is becoming more and more common.

The short answer: It is generally not possible to recover deleted data from internal SSD drives, because they are very likely using the TRIM function.

How do I know if TRIM is enabled?

It probably is. If you have an SSD drive that is internal to your computer (NVMe drive, SATA drive, etc), and you’re using a modern operating system (Windows 7 and newer, macOS, etc), then it’s likely that TRIM will be enabled by default, because it’s highly beneficial to the performance of your SSD drive.

Why?

SSD (flash memory) drives work fundamentally differently from older magnetic (spinning disk) hard drives.

With both types of drives, when data is deleted, the physical blocks that were occupied by the data are marked as “available”, and become ready to be overwritten by new data.

With a magnetic spinning hard drive, an available block can be overwritten regardless of what data was in that block previously; the old data gets overwritten directly. However, the same is not true for flash memory: a flash memory block must be erased explicitly before new data is written to it. And this erase operation is relatively expensive (i.e. slow). If an SSD drive was to erase memory blocks “on demand”, i.e. only when a new file is being written, it would slow down the write performance of the drive significantly.

Therefore, an SSD drive will erase unused memory blocks preemptively, so that the memory will be pre-erased when a new file needs to be written to it. Since the drive has no knowledge of what filesystem exists on it, the drive relies on the operating system to inform it about which memory blocks are no longer used. This is done using the TRIM command: When the operating system deletes a file, in addition to updating the necessary filesystem structures, it also sends a TRIM command to the drive, indicating that the memory blocks occupied by the deleted file can now be considered “stale”, and queued up for erasing.

The SSD drive erases TRIMmed blocks in the background while the drive is idle, transparently to other operations. In effect this means that for any file that’s deleted from an SSD drive, once the drive purges those stale blocks, the actual contents of the file will be wiped permanently from the drive, and will no longer be recoverable.

The above is a slight simplification, since SSD drives also perform wear-leveling which uses rather complex logic involving copying and remapping logical addresses to different physical memory pages, but the general point stands.

Exceptions

There are a few cases when deleted data may be recoverable from an SSD drive:

  • If TRIM happens to be disabled for some reason. As mentioned above, the TRIM feature is something that is enabled at the level of the operating system. It is usually enabled by default for performance reasons. Nevertheless, most operating systems will let you check whether or not TRIM is enabled, and optionally disable it. For example, in Windows you can run the command fsutil behavior query disabledeletenotify to see if TRIM is currently enabled.
  • If you’re using an external SSD drive connected over USB. Support for issuing the TRIM command over a USB connection is relatively new, and is not yet supported by all USB controllers and operating systems. If you deleted files from an external SSD drive that’s connected to a USB port, there’s a fair chance that the data might be recoverable.
  • If you attempt to recover the files immediately after they’re deleted, and the drive provides the contents of stale blocks (which is rare). As mentioned above, the TRIM command puts the deleted memory blocks in a queue of stale blocks, so it’s possible that the SSD drive won’t actually erase them for a short while. The timing of when exactly the TRIMmed blocks are erased is entirely up to the drive itself, and differs by manufacturer. If you search the drive for deleted data sufficiently soon after it’s deleted, and the drive doesn’t return null data for stale blocks, it may still be possible to recover it.
  • Due to the way that SSD drives perform wear-leveling, it may be possible for stale blocks to get reallocated and copied to different physical positions in the drive, leaving behind the original data in their old locations. Unfortunately this kind of data is generally not accessible using any software tools, including DiskDigger, and can be accessed only by disassembling the drive and reading the physical flash memory chip directly, which is a very expensive procedure done by enterprise-level data recovery labs.

Summary

Despite the above challenges, there’s no harm in trying to use DiskDigger to recover files from your SSD drive, and in certain cases it will be successful. However, if you’ve deleted files from an internal SSD drive, the overall prognosis for recovering them is unfortunately not good.

Reverse engineering a 25-year-old Visual Basic app

Following up from last week’s misadventures with the Avant Stellar keyboard (trying and failing to extract macro information from the keyboard’s internal memory), there was another glimmer of hope:  my friend found a backup file that possibly contains all the macros that were saved to the keyboard.  If I could just reverse-engineer this backup, we could extract the macros directly from the file.  It is a 2 KB file with a .KBD extension, unrecognizable as any binary format I’ve seen to date. Here is a partial hex dump of the file:

It’s pretty clear that the file contains a key mapping, as evidenced by the list of incrementing 32-bit numbers at the beginning, up to offset 0x210.  There are roughly 120 increasing numbers, which is roughly the number of keys on the keyboard, so we can safely assume that this is the key mapping.  After the key mapping, I presume, comes the macro information, and this is where things get tricky, since there’s virtually no way to tell how the macros are encoded in the file. The data simply looks too general to make sense of.

An obvious possibility would be to “load” the backup file into the Avant software tool that came with the keyboard, and visually inspect the macro(s) assigned to each key.  But no matter what I tried, the software would not load the file.  Or rather, it loaded the key mapping, but not the macros.  Time to think about the nuclear option: disassemble the Avant software and see how it’s actually processing the backup file.

Looking at the folder contents of the Avant software tool, I immediately notice a dead giveaway: VBRUN300.DLL, which means this tool was written in Visual Basic 3.0.  This makes our job much easier, because there are actually ready-made tools for decompiling Visual Basic executables. (If you recall, Visual Basic compiles executables into p-code instead of native machine code, which makes them much more straightforward to decompile.)  All of this took me quite a while to remember, because I hadn’t used these tools since my early, early hacking days, and it took a little while longer to find them in my archives!  The go-to utility for performing this task was literally called VB3 Decompiler, and the way to find this tool on the web today is… outside the scope of this post.

The decompilation basically results in several Visual Basic source files, in which the original function names are intact, but the local and global variables are changed to generic identifiers, since those names are not stored in the compiled code. It takes a little bit of further massaging to get these files to actually build within Visual Basic, but after that, it’s almost as if you have the original source code of the program at your fingertips.

There was one other minor hurdle because the Avant software uses custom UI components (.VBX files) that don’t allow themselves to be used in Design mode (as part of a copy-protection or licensing mechanism), but this is bypassable using another utility in the decompiler suite that “fools” Visual Basic into loading the components anyway.

With the source code buildable and debuggable, we can now easily run the program and load the .KBD backup file, and trace through where it processes the data in the file:

Even though the variable names aren’t very descriptive in the above screenshot, it’s easy enough to spot the loop that deserializes the keyboard macros, and how each macro is composed.  Not only that, but we can determine what was preventing it from displaying the macros in the first place – it turned out that it expects the keyboard to be physically connected while running, and while I’m pretty sure that we tried loading the backup with the keyboard attached, it wasn’t working anyway, probably because the keyboard is malfunctioning and no longer able to communicate properly.  But at last, with this requirement bypassed, the macros that were loaded from the backup file finally reveal themselves:

Recovering data from QIC-80 tapes: another case study

In another of my recent data recovery cases, the patient was a QIC-80 (DC 2000 mini cartridge) tape that was in pretty bad shape. From the outside I could already see that it would need physical repairs, so I opened it up and found a harrowing sight:

The problem with QIC cartridges in general is that they use a tension band to drive the tape spools. If you look at a QIC cartridge, it’s completely enclosed, except for a plastic wheel that sticks out and makes contact with the capstan mechanism when it’s inserted into the tape drive.  The flexible tension band is tightened in such a way that it hugs the tape spools and drives them using physical friction.

This tension band is a major point of weakness for these types of tapes, because the lifespan of the band is very much finite.  When the tape sits unused for many years, the band can stiffen or lose its friction against the tape spools, which can result in one of two scenarios:

The tension band can break, which would make the cartridge unusable and would require opening the cartridge and replacing the band. This is actually not the worst possible outcome because replacing the band, if done properly, isn’t too disruptive of the tape medium itself, and usually doesn’t result in any data loss.

A much worse scenario is if the tension band becomes weakened over time, such that it no longer grips the spools properly, so that the next time you attempt to read the cartridge, it will spin the spools inconsistently (or cause one of the spools to stall entirely), which will cause the tape to bunch up between the spools, or bend and crease, creating a sort of “tape salad” inside the cartridge, all of which can be catastrophic for the data on the tape. In this kind of case, the cartridge would need to be disassembled and the tape manually rewound onto the spools, being extremely careful to undo any folds or creases (and of course replace the band with a new one, perhaps from a donor tape). This will almost certainly result in loss of data, but depends greatly on the degree to which the tape was unwound and deformed.

Note that the tape drive that is reading the tape is relatively “dumb” with respect to the physical state of the tape. It has no way of knowing if the tension band is broken, or if the tape isn’t wound or tensioned properly, or if what it’s doing is damaging the tape even further. Great care must be taken to examine the integrity of the tape before attempting to read it.

With this cartridge, it’s clear that the tension band has failed (but didn’t break). The tape has obviously bunched up very badly on both spools.  Less obviously, the white plastic wheels at the bottom show evidence that the tension band has degraded, with bits of residue from the black band being stuck on the wheels. The fix for this cartridge was to remove the bad tension band, clean the white plastic wheels, respool and tighten the tape, and install a new band from a donor tape. After the procedure was complete, more than 99% of the data was recovered. The tape header was readable, as were the volume tables. Only a few KB of the file contents were lost.

Therefore, when recovering data from very old QIC tapes, it’s probably a good idea to replace the tension band preemptively with a known-good band, to minimize the chance of breakage and damage to the tape. This is why I keep a small stockpile of new(er) tapes from which I can harvest the tension band when needed. At the very least, it’s a good idea to open up the cartridge and examine the band before making any attempts to read data from it.

Where did we go wrong?

I started programming seriously in the late 1990s, when the concept of “visual” IDEs was really starting to take shape. In one of my first jobs I was fortunate enough to work with Borland Delphi, as well as Borland C++Builder, creating desktop applications for Windows 95.  At that time I did not yet appreciate how ahead of their time these tools really were, but boy oh boy, it’s a striking contrast with the IDEs that we use today.

Take a look: I double-click the icon to launch Delphi, and it launches in a fraction of a second:

But it also does something else: it automatically starts a new project, and takes me directly to the workflow of designing my window (or “Form” in Borland terms), and writing my code that will handle events that come from the components in the window. At any time I can click the “Run” button, which will compile and run my program (again, in a fraction of a second).

Think about this for a bit. The entire workflow, from zero to building a working Windows application, is literally less than a second, and literally two clicks away.  In today’s world, in the year 2020, this is unheard of.  Show me a development environment today that can boast this level of friendliness and efficiency!

The world of software seems to be regressing: our hardware has been getting faster and faster, and our storage capacity larger and larger, and yet our software has been getting… slower. Think about it another way: if we suppose that our hardware has gotten faster by two orders of magnitude over the last 20 years, and we observe that our software is noticeably slower than it was 20 years ago, then our software has gotten slower by two orders of magnitude! Is this… acceptable? What on earth is going on?

Laziness

Engineers like to reuse and build upon existing solutions, and I totally understand the impulse to take an existing tool and repurpose it in a clever way, making it do something for which it wasn’t originally intended. But what we often fail to take into account is the cost of repurposing existing tools, and all the baggage, in terms of performance and size, that they bring along and force us to inherit.

Case in point: suppose that the only language you know is JavaScript, and suppose that you wanted to start building desktop applications, but didn’t want to learn the languages and tools normally associated with desktop development, e.g. C++, C#, etc. What can you do? Well, one option would be to build a compiler from scratch, which would actually compile JavaScript into native machine code. But that would be hard. How about a simpler solution: take a full-blown web browser, and literally bundle it as the engine that will run your desktop app, with the logic of your app being in JavaScript, and the “window” of your app becoming a web page that is run by the bundled browser! This is, of course, the idea behind Electron, an alarmingly popular framework for building desktop apps today.

But what about the cost of using Electron? What is the cost of bundling all of Chromium just to make your crappy desktop app appear on the screen? Just to take an example, let’s look at an app called Etcher, which is a tool for writing disk images onto a USB drive. (Etcher is actually recommended by the Raspberry Pi documentation for copying the operating system onto an SD card.)

We know how large these types of tools are “supposed” to be (i.e. tools that write disk images to USB drives), because there are other tools that do the same thing, namely Rufus and Universal USB Installer, both of which are less than 2 MB in size, and ship as a single executable with no dependencies. And how large is Etcher by comparison? Well, the downloadable installer is 130 MB, and the final install folder weighs in at… 250 MB. There’s your two-orders-of-magnitude regression! Looking inside the install folder of Etcher is just gut-wrenching:

Why is there a DLL for both OpenGL and DirectX in there? Apparently we need a GPU to render a simple window for our app. The “balenaEtcher” executable is nearly 100 MB itself. But do you see that “resources” folder? That’s another 110 MB! And do you see the “locales” folder? You might think that those are different language translations of the text used in the app. Nope — it’s different language translations of Chromium. None of it is used by the app itself. And it’s another 5 MB. And of course when Etcher is running it uses 250+ MB of RAM, and a nonzero amount of CPU time while idle. What is it doing?!

As engineers, this is the kind of thing that should make our skin crawl. So why are we letting this happen? Why are we letting software get bloated beyond all limits and rationalize it by assuming that our hardware will make up for the deficiencies of our software?

The web

The bloat that has been permeating the modern web is another story entirely. At the time of this writing, the New York Times website loads nearly 10 MB of data on a fresh load, spread over 110 requests. This is quite typical of today’s news websites, to the point where we don’t really bat an eye at these numbers, when in fact we should be appalled. If you look at the “source” of these web pages, it’s tiny bits of actual content buried in a sea of <script> tags that are doing… something? Fuck if I know.

The bloat seen on the web, by the way, is being driven by more nefarious forces than sheer laziness. In addition to building a website using your favorite unnecessaryframework” that you can choose willy-nilly (which varies with every web developer you ask, and then has to be hosted on a separate CDN because your web server can’t handle the load), you also have to integrate analytics packages into your website, as requested by your marketing department, and another analytics package requested by your user research team, and another analytics package requested by your design team, etc. If one of the analytics tools goes out of fashion, leave the old code in! Who knows, we might need to switch back to it someday. It doesn’t seem to be impacting load speeds… much… on my latest MacBook Pro. The users won’t even notice.

And of course, ads. Ads everywhere. Ads that are basically free to load whatever arbitrary code they like, and are totally out of the control of the developer. Oh, you say the users are starting to use ad blockers? Let’s add more code that detects ad blockers and forces users to disable them!

The web, in other words, has become a dumpster fire. It’s a dumpster fire of epic proportions, and it’s not getting better.

What to do?

What we need is for more engineers to start looking at the bigger picture, start thinking about the long term, and not be blinded by the novelty of the latest contraption without understanding its costs. Hear me out for a second:

  • Not everything needs to be a “framework” or “library.” Not everything needs to be abstracted for all possible use cases you can dream of. If you need code to do something specific, sometimes it’s OK to borrow and paste just the code you need from another source, or god forbid, write the code yourself, rather than depending on a new framework. Yes, you can technically use a car compactor to crack a walnut, but a traditional nutcracker will do just fine.
  • Something that is clever isn’t necessarily scalable or sustainable. I already gave the example of Electron above, but another good example is node.js, whose package management system is a minor dumpster fire of its own, and whose dependency cache is the butt of actual jokes.
  • Sometimes software needs to be built from scratch, instead of built on top of libraries and frameworks that are already bloated and rotting. Building something from the ground up shouldn’t be intimidating to you, because you’re an engineer, capable of great deeds.
  • Of course, something that is new and shiny isn’t necessarily better, either. In fact, “new” things are often created by fresh and eager engineers who might not have the experience of developing a product that stands the test of time. Treat such things with a healthy bit of skepticism, and hold them to the same high standards as we hold mature products.
  • Start calling out software that is bad, and don’t use it until it’s better. As an engineer you can tell when your fellow engineers can do a better job, so why not encourage them to do better?
  • Learn to say No! When the newest JavaScript framework starts making its rounds, or when the latest “cross-platform” app development framework is unveiled, or when everyone starts talking about microservices, it’s OK to say “No!” “No, thank you!” “Not until we understand how this will be beneficial to us five years from now.” “Not until we understand the costs, in terms of space, performance, and sanity, of adopting this new thing.”

I suppose that with this rant I’m adding my voice to a growing number of voices that have similarly identified the problem and laid it out in even greater detail and eloquence than I have. I wish that more developers would write rants like this. I wish that this was required training at universities. I have a sinking feeling, however, that these rants are falling on deaf ears, which is why I’ll add one more suggestion that we, as engineers, can do to raise awareness of the issue:

Educate regular users about how great software can be. Tell your parents, your friends, your classmates, that a web page shouldn’t actually need ten seconds to load fully. Or that they shouldn’t need to purchase a new generation of laptop every two years, just to keep up with how huge and slow the software is becoming. Or that the software they install could be one tenth of its size, freeing up that much more space for their photos or documents, for example. That way, regular users can be as fed up as we are about the current state of software, and finally start demanding us to do better.