 I’m usually not a big fan of custom controls except in the most extreme circumstances. From the point of view of usability, it should always make the most sense to use the controls that are shipped with the Operating System. Your user base is already familiar with the OS’s native controls, so creating custom controls would only add to the learning curve for your application. But I digress. Sometimes, there are certain controls that just beg to be written, whether they’re useful or not.
That’s why I decided to write this seven-segment LED control: not because it’s any more "useful" than a standard Label control, but because it looks freakin’ sweet. I also wrote the control to become more familiar with the internals of C# and .NET in general. And, if you like the control and are able to use it, or learn from it, so much the better.
Even if you haven’t heard the name "seven-segment display" before, you’ve probably seen quite a few in your lifetime. They appear on pretty much every piece of electronic equipment that needs to display numbers for any reason, like the timer on a microwave oven, the display on a CD player, or the time on your digital wristwatch.
They’re called seven-segment displays because they’re actually made up of seven "segments" — seven individual lights (LEDs or otherwise) that light up in different patterns that represent any of the ten digits (0 – 9).
Using the code
This custom control can be built into your application by simply including the "SevenSegment.cs" file in your project. Rebuild your project, and you’ll be able to select the SevenSegment control from your tool palette and drop it right onto your forms.
To replicate the look of a seven-segment display, I draw seven polygons that precisely match the physical layout of a real display. To model the polygons, I drew them out on graph paper, and recorded the coordinates of each point in each polygon. To draw the polygons on the control, I use the FillPolygon function, passing it the array of points that represent the polygon. Let’s examine the control’s Paint event to see exactly what’s going on:
private void SevenSegment_Paint(object sender, PaintEventArgs e)
{
	//this will be the bit pattern that gets shown on the segments,
	//bits 0 through 6 corresponding to each segment.
	int useValue = customPattern;

	//create brushes that represent the lit and unlit states of the segments
	Brush brushLight = new SolidBrush(colorLight);
	Brush brushDark = new SolidBrush(colorDark);

	//Define transformation for our container...
	RectangleF srcRect = new RectangleF(0.0F, 0.0F, gridWidth, gridHeight);
	RectangleF destRect = new RectangleF(Padding.Left, Padding.Top, this.Width - Padding.Left - Padding.Right, this.Height - Padding.Top - Padding.Bottom);

	//Begin graphics container that remaps coordinates for our convenience
	GraphicsContainer containerState = e.Graphics.BeginContainer(destRect, srcRect, GraphicsUnit.Pixel);

	//apply a shear transformation based on our "italics" coefficient
	Matrix trans = new Matrix();
	trans.Shear(italicFactor, 0.0F);
	e.Graphics.Transform = trans;

	//apply antialiasing
	e.Graphics.SmoothingMode = SmoothingMode.AntiAlias;
	e.Graphics.PixelOffsetMode = PixelOffsetMode.Default;

	// Draw elements based on whether the corresponding bit is high!
	// "segPoints" is a 2D array of points that contains the segment coordinates to draw
	e.Graphics.FillPolygon((useValue & 0x1) == 0x1 ? brushLight : brushDark, segPoints[0]);
	e.Graphics.FillPolygon((useValue & 0x2) == 0x2 ? brushLight : brushDark, segPoints[1]);
	e.Graphics.FillPolygon((useValue & 0x4) == 0x4 ? brushLight : brushDark, segPoints[2]);
	e.Graphics.FillPolygon((useValue & 0x8) == 0x8 ? brushLight : brushDark, segPoints[3]);
	e.Graphics.FillPolygon((useValue & 0x10) == 0x10 ? brushLight : brushDark, segPoints[4]);
	e.Graphics.FillPolygon((useValue & 0x20) == 0x20 ? brushLight : brushDark, segPoints[5]);
	e.Graphics.FillPolygon((useValue & 0x40) == 0x40 ? brushLight : brushDark, segPoints[6]);

	//draw the decimal point, if it's enabled
	if (showDot)
		e.Graphics.FillEllipse(dotOn ? brushLight : brushDark, gridWidth - 1, gridHeight - elementWidth + 1, elementWidth, elementWidth);

	//finished with coordinate container
	e.Graphics.EndContainer(containerState);
}
You can set the value displayed in the control through two properties: Value and CustomPattern. The Value property is a string value that can be set to a single character such as "5" or "A". The character will be automatically translated into the seven-segment bit pattern that looks like the specified character.
If you want to display a custom pattern that may or may not look like any letter or number, you can use the CustomPattern property, and set it to any value from 0 to 127, which gives you full control over each segment, since bits 0 to 6 control the state of each of the corresponding segments.
The way it’s done in the code is as follows. I have an enumeration that encodes all the predefined values that represent digits and letters displayable on seven segments:
public enum ValuePattern
{
    None = 0x0, Zero = 0x77, One = 0x24, Two = 0x5D, Three = 0x6D,
    Four = 0x2E, Five = 0x6B, Six = 0x7B, Seven = 0x25,
    Eight = 0x7F, Nine = 0x6F, A = 0x3F, B = 0x7A, C = 0x53,
    D = 0x7C, E = 0x5B, F = 0x1B, G = 0x73, H = 0x3E,
    J = 0x74, L = 0x52, N = 0x38, O = 0x78,
    P = 0x1F, Q = 0x2F, R = 0x18,
    T = 0x5A, U = 0x76, Y = 0x6E,
    Dash = 0x8, Equals = 0x48
}
Notice that each value is a bit map, with each bit corresponding to one of the seven segments. Now, in the setter of the Value property, I compare the given character against our known values, and use the corresponding enumeration as the currently displayed bit pattern:
//is it a digit?
int tempValue = Convert.ToInt32(value);
switch (tempValue)
{
	case 0: customPattern = (int)ValuePattern.Zero; break;
	case 1: customPattern = (int)ValuePattern.One; break;
	...
}
...
//is it a letter?
string tempString = Convert.ToString(value);
switch (tempString.ToLower()[0])
{
	case 'a': customPattern = (int)ValuePattern.A; break;
	case 'b': customPattern = (int)ValuePattern.B; break;
	...
}
Either way, the bit pattern to be displayed in the control ends up in the customPattern variable, which is then used in the Paint event as shown above.
You can also "italicize" the display by manipulating the ItalicFactor property. This value is simply a shear factor that gets applied when drawing the control, as seen in the Paint event. An italic factor of -0.1 makes the display look just slightly slanted, and a whole lot more professional.
If you begin noticing that the segments are being drawn outside the boundary of the control (perhaps from too much italicizing), you can use the Padding property and increase the left/right/top/bottom padding until all of the shapes are within the control’s client rectangle.
The control has several other convenient properties for you to play with, such as the background color, the enabled and disabled color for the segments, and the thickness of the segments.
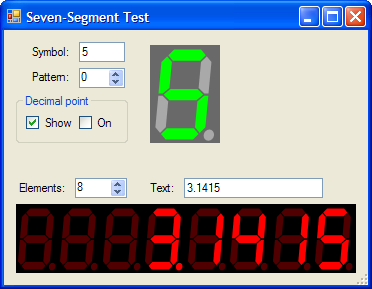
Seven-segment array
In addition to the seven-segment control itself, I’m throwing in another control which is an array of seven-segment displays. This allows you to display entire strings on an array of 7-seg displays. Check out the demo application, and dig around the source code to see how it’s used; it’s really simple.
To use the array control, include the "SevenSegmentArray.cs" file in your project and rebuild. You’ll then be able to select the SevenSegmentArray control from the tool palette.
This control has an ArrayCount property that specifies the number of 7-seg displays in the array, as well as a Value property that takes any string to be displayed on the array. Easy, right?
Other thoughts
I must say I had a lot of fun writing this control, and .NET helped put a lot of the fun into it by making it incredibly easy to draw your own shapes, transform coordinates, and introduce truly powerful properties.
Also, coming from somewhat of an electronics background, for me, seeing this control brings a certain nostalgia for simpler times. I hope you enjoy it.