Brain dump, January 2021

If your app has a “splash screen,” it’s a tacit admission that the app doesn’t load as fast as it should. If you build a splash screen into your app on purpose, you’re in the wrong field.


Programming languages are tools; they are a means to an end. There are very many programming languages. Don’t fixate on just one. It’s not particularly useful to become a great expert in any single language. It’s better to be adaptable and pick up a language for an application for which it will be useful. Unless you’re an actual hobbyist of language design, there’s really no reason to “master” a programming language for its own sake. What you should master are theoretical computer science concepts, and an instinct for where these concepts fit in real-world applications. Once you do that, it becomes easy enough to express those concepts using the language that best fits your task.


I would say I’m almost a libertarian, but not quite. Libertarianism seems to be predicated on the idea that individual people know what’s best for themselves. As I get older, I see that this is actually a very, very unsafe assumption. A good example is vaccinations: vaccinations have to be instituted and mandated at the federal level, lest the general public be swayed against them by less credible scientists like Marjorie Taylor Greene. Another example is education, especially education of science (viz. evolution). It’s probably better for school curricula to be composed at the federal level, instead of being voted upon by local communities of parents and teachers who grew up on the same nonsense that they teach.


When I reject the existence of a god, I’m not just rejecting the god, I’m rejecting the entire logical framework within which this god is constructed. So, as long as you continue to make arguments that are confined to that framework, you’re not adding anything new to the discussion. The fact that so many people in the world are religious says nothing about whether such a being actually exists; instead, it says something about human psychology.  It says something about these ancient psychological devices that we evolved during our prehistory as frightened primates struggling to survive and understand the world around us. It’s so trivially easy to reverse-engineer religion, and see exactly which buttons it pushes on the psyche, which emotions it appeals to, and what various uses it has for its practitioners, whether it’s for good or for evil.


The definition of “conservative” seems to be changing. Conservative used to mean wanting to go back to the old days, where “old” days could be fifty years in the past. But today you can be called a conservative for wanting to go back ten years, when ideas that were considered liberal at the time would be considered far-right today. It’s a bit of a problem when our moral universe changes within a human lifetime, and an even bigger problem when our moral universe changes with each new social media app.

How to recover data from QIC tapes

Simple: ask me to do it for you!

But if you insist on trying it yourself, here is a rough guide on the steps required to recover data safely and effectively from QIC-150 and QIC-80 cartridges.

QIC-80

First there is the matter of hardware. You’ll need to obtain a QIC-80 tape drive, such as the Colorado 250MB drive which was very common at the time. These are drives that usually connect to the floppy controller on the PC’s motherboard. There are a few types of drives that connect to the parallel port, but these are not recommended since they are much less compatible with various software.

Now you have a few choices. You may choose to take a binary image of the tape, which will be literally a dump of all the data on it. This can be done with Linux using the ftape driver.   Or you can attempt to use the original software that was used to write the tape. This would require you to stage the specific operating system and backup software, boot into it, and use it to restore the data from the tape.

Getting a binary image

This option is more straightforward, and also faster and more reliable, but the disadvantage is that you’ll need to manually decode the data and extract the files from it. Fortunately the data written to QIC-80 tapes mostly adheres to a single specification, and there are ready-made tools to decode this format.

To get a binary dump, you’ll need to boot into Linux. However, because the ftape driver has long been abandoned, it’s only available in very old distributions of Linux. The last version of Ubuntu that included ftape in the kernel was 6.06. Fortunately this version is readily available for download and can be used as a bootable live CD. Once it’s booted, you can load the ftape module by executing:

$ sudo modprobe zftape

This should create the appropriate logical devices that will let you access the tape drive. The device you’ll usually need is /dev/nqft0.

And to start reading data immediately, just execute dd as usual:

$ sudo dd if=/dev/nqft0 of=data.bin conv=sync,noerror &

Don’t forget the ampersand at the end, so that dd will run in the background and give you back control of the console.   The conv=sync,noerror parameter will make dd continue if it encounters errors and pad the output with zeros in case of a bad block. Although the skipping of errors hasn’t seemed to work very reliably with QIC-80 drives. If the drive goes into a loop of shoe-shining the tape for more than a minute, you should probably give up on that volume of the tape. Speaking of volumes:

The tape may consist of multiple volumes, which basically means that multiple backups were written to it in succession.   When your first dd call is complete, it will stop at the end of the first volume on the tape. But there may be additional volumes. You may call dd again right afterwards, which will proceed to read the next volume, and so on. You can also use the vtblc tool to see an actual list of the volumes on the tape.

You may also want to skip directly to another volume on the tape. This is useful if you encounter errors while reading one volume, and want to jump directly to another volume. I’ve found that the best bet is to perform a fresh boot, then skip to the desired volume, and start reading.   To skip to a volume, use the mt fsf command:

$ sudo mt -f /dev/nqft0 fsf x

…where x is the number of volumes to skip. So for example if you want to read the third volume on the tape, execute fsf 2 and start reading.

Note that the drive might not actually fast-forward as soon as you make the mt fsf call. It will usually fast-forward when you actually make the dd call to start reading data.

Using original backup software

If you want to go the route of using the original backup software that was used to write the tape, you’re now in the Wild West of compatibility, trial and error, and general frustration.   Most of the frustration comes from the old software’s incompatibility with modern CPUs (too fast) and modern RAM (too much).

Since the majority of these tapes were written during the DOS era, you’ll need to get a solid DOS environment going, which is surprisingly simple with today’s hardware. If your motherboard supports booting from a USB drive, it will probably be able to boot into DOS. This is because DOS uses the BIOS for disk access, and the motherboard provides access to the USB disk through the BIOS, so that DOS will consider the USB disk to be the C: drive.

There are a lot of different tape backup tools for DOS, but one that I’ve found to be very reliable is HP Backup 7.0. This software has recognized and recovered the vast majority of DOS backups that I’ve seen.   If this tool fails to recognize the tape format, try one of these other tools:

Central Point Backup

This is bundled with PC Tools 9.0. This is another DOS-based backup tool, but it could write the backup in a slightly different format. However, there are very specific steps for getting this software to work.   It does not work on modern (fast) CPUs because it relies on timing logic that causes an integer overflow. This can manifest as an “overflow” error or a “divide by zero” error.

To run Central Point Backup on a modern processor, you will first need to run the SlowDown utility from Bret Johnson.   I’ve found that these parameters work:

C:\> SLOWDOWN /m:25 /Int70

Note that this will cause the keyboard to become sluggish, and you might have some trouble typing, but it’s the only way.

NTBackup

Windows NT came with its own backup utility that could be used to write to floppy tapes. The trouble, however, is getting Windows NT to boot on a live modern system.  The goal is to get a boot disk that runs Windows NT Service Pack 6, which does in fact work well with modern hardware.  If you want to do this from scratch, you can try the following:

  • Connect a spare SATA hard drive (a real one) to your computer.
  • Boot into Linux and make sure to have qemu installed.
  • Run qemu, booting from the Windows NT install ISO image, and having the real hard drive as the emulated disk. For the initial installation, give qemu more modest parameters, including less memory (-m 256) and a lesser CPU (-cpu pentium).
  • After Windows NT is installed, power down the emulated machine, and copy the Service Pack 6 update executable onto the disk.
  • Power the emulated machine back up and install SP6.
  • You can then power it down, and you now have a hard drive loaded with Windows NT SP6, ready to be booted on real modern hardware.

Microsoft Backup (Windows 95)

Windows 95 is extremely tricky to get working on modern hardware, to the point where I would not even recommend attempting it. It may be possible to apply the AMD-K6 update patch, which supposedly allows it to run correctly on fast processors, and then apply the PATCHMEM update that allows it to support large amounts of RAM, but I have not had success with either of these. For me, Windows 95 is forever relegated to running in an emulator only. And fortunately I haven’t seen very many floppy tapes that were written using the backup utility from Windows 95.

QIC-150 and other SCSI tape drives

Reading data from QIC-150 tapes, or most other types of tapes from that time period, is slightly different from reading QIC-80 tapes, mostly because the majority of these types of tape drives connect to the SCSI interface of your PC. This means you’ll need a SCSI adapter that plugs into your motherboard. I’ve had a lot of success with Adaptec UltraWide cards, which are PCI cards, meaning that you’ll need a motherboard that still has older-style PCI slots.

And of course you’ll need a QIC-150 tape drive, such as the Archive Viper 2150, or the Tandberg TDC3660. Newer models of tape drives might be backwards-compatible with older types of tapes, but make sure to check the compatibility list for your drive before attempting to use it to read a tape.

Extracting the data from a tape is extremely simple using Linux. The most recent Linux distributions should work fine (as of 2020). If your tape drive is connected correctly to your SCSI adapter (and terminated properly using a terminating resistor), it will be detected automatically by Linux and should appear as a tape device, such as /dev/nst0.

To start reading data from the tape, execute the following:

$ sudo dd if=/dev/nst0 of=foo.bin conv=noerror,sync

See the previous section on QIC-80 tapes on further usage of dd, and how to read multiple volumes of data from the tape.

In my travels I have also seen tapes that have a nonstandard block size (i.e. greater than 512 bytes). This may manifest as an error given by dd such as “Cannot allocate memory.” In these cases, you can try setting the block size to a generous amount when invoking dd:

$ dd if=/dev/nst0 of=foo.bin conv=noerror,sync bs=64k

A large enough buffer size should fix the allocation error, but if you plan to use it with the “sync” option, then you must know the exact size of the buffer (i.e. the exact block size used by the tape). Otherwise the blocks will be written to the output file with padding that fills up any unused space in each block buffer. A common block size I’ve seen is 16k, especially in 8mm tapes.

Using original backup software

Of course it is also possible to use the original backup software that was used to write the tape. However, it’s much safer to obtain a binary dump of the tape in Linux first, before attempting to read the tape again using other tools. This way you’ll have a pristine image of the tape in case the tape becomes damaged or worn out during subsequent reads.

In many cases there are software tools that will extract the archived file collection directly from a binary image. But if these tools do not recognize the format of your tape image, you will indeed have to use the original software that was used to write it, assuming you can remember what it was. This can be quite difficult: setting up SCSI support in DOS can be a pain; the tape might not have been written using DOS at all, but something like Amiga, and so on. Regardless, the major hurdle is getting the data from the tape to the PC. Decoding the contents of the data is usually a minor detail.

…Or, if you don’t feel like it

I offer first-rate tape recovery services, at a fraction of the cost of other companies. Get in touch anytime and let me know how I can help!
Confirmation dialogs

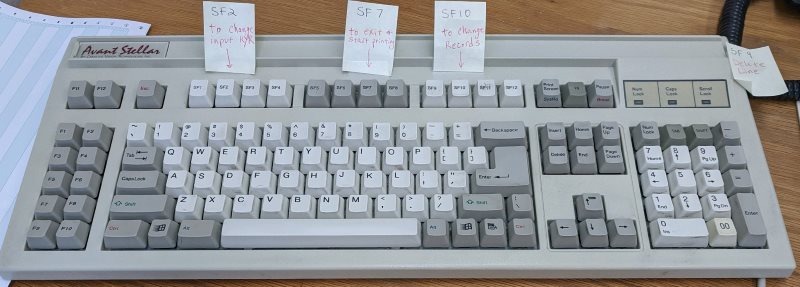
Recently a friend of mine contacted me with an interesting issue.   He got ahold of a keyboard from an old PC workstation used with some legacy accounting software. But this was no regular keyboard — it was an Avant Stellar keyboard, in which all of the keys were remappable, and any key could be programmed with custom macros.

The original owner of the keyboard was no longer at the accounting firm, but my friend was very interested in determining what macros were assigned to each key, so that the accounting firm could use the old software more effectively, and hopefully transition away from it more easily.

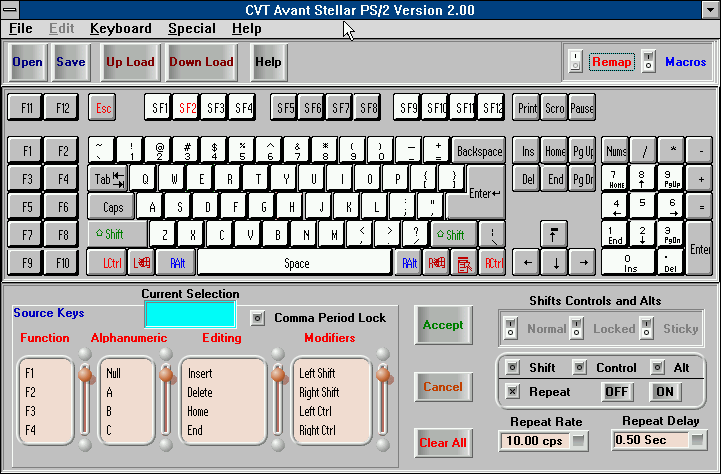
I helped by managing to dig up the original software that shipped with these keyboards, which worked with MS-DOS and older versions of Windows. Here is what the software looks like:

Clearly this software is where the user gets to create their own macros and remap all of the key bindings. No less clearly, the software allows us to “Upload” and “Download” the mappings.   So, naturally, my friend thought the most sensible action would be to “Download” the current state of the keyboard and view all the macros in the UI of this software tool.   And so, he clicked the Download button, and… nothing seemed to happen. After a brief progress message, the interface stayed the same.

Now here’s the question: What does “upload” and “download” mean?   In 2020, download generally means “fetch something from an external source and save it onto the computer,” and upload means “send something from the computer to an external source.”   And you might think, in the context of this keyboard, download means “retrieve the current state of the keyboard onto the computer”…

But sadly, twenty years ago, the programmers of this software had the opposite definition of “download” in their minds.   Downloading meant loading the current mappings from the software onto the keyboard!

And even more sadly, the programmers didn’t include a prominent confirmation dialog that says, “CAUTION: this will load the new mapping onto the keyboard and overwrite any previous settings!”   And with a single click, the keyboard was overwritten without any warning or backup.   The only thing the programmers did was include a tooltip that appears when hovering over the Download button:

…but the tooltip appeared only after it was already too late.

Home security with Raspberry Pi

The versatility of the Raspberry Pi seems to know no bounds. For a while I’ve been wanting to set up a DIY home security system in my house, and it turns out that the Raspberry Pi is the perfect choice for this task, and more. (The desire for a security system isn’t because we live in a particularly unsafe neighborhood or anything like that, but just because it’s an interesting technical challenge that provides a little extra peace of mind in the end.)

Camera integration

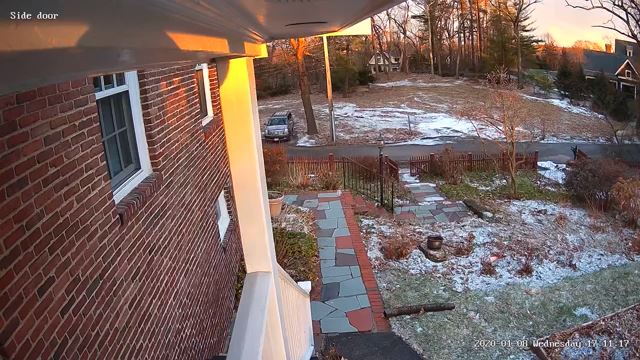
I began with a couple of IP cameras, namely the Anpviz Bullet 5MP cameras, which I mounted on the outside of the house, next to the front door and side door.  The cameras use PoE (power over Ethernet), so I only needed to route an Ethernet cable from the cameras to my PoE-capable switch sitting in a closet in the basement.

At first I assumed that I would need to configure my Raspberry Pi (3) to subscribe to the video streams from the two cameras, do the motion detection on each one, re-encode the video onto disk, and then upload the video to cloud storage.  And in fact this is how the first iteration of my setup worked, using the free MotionEye software.  However, the whole thing was very sluggish, since the RPi doesn’t quite have the horsepower to be doing decoding, encoding, and motion detection of multiple streams at once (and I didn’t want to compromise by decreasing the video quality coming from the cameras), so my final output video was less than 1 frame per second, with my RPi running at full load and getting quite warm. Definitely not a sustainable solution.

But then I realized that a much simpler solution is possible. The Anpviz cameras are actually pretty versatile themselves, and can perform their own motion detection. Furthermore, they can write the video stream directly onto a shared NFS folder!  Therefore, all I need to do is set up the RPi to be an NFS server, and direct the cameras to write to the NFS share whenever motion is detected.

And that’s exactly what I did, with a little twist:  I attached two 16 GB USB flash drives to the RPi, with each USB drive becoming an NFS share for each respective camera. That way I’ll get the maximum throughput of data from the cameras directly to USB storage. With this completed setup, the Raspberry Pi barely reaches 1% CPU load, and stays completely cool.

I wrote a Python script that runs continuously in the background and checks for any new video files being written onto the USB drives. If it detects a new file, it automatically uploads it to my Google Drive account, using the Google Drive API which turned out to be fairly easy to work with, once I got the hang of it. The script automatically creates subfolders in Google Drive corresponding to the current day of the week, and which camera the video is from. It also automatically purges videos that are more than a week old.

I have to heap some more praise onto the cameras for supporting H.265 encoding, which compresses the video files very nicely. All in all, with the amount of motion that is typical on a given day, I’m averaging about 1 GB per day of video being recorded (at 1080p resolution!), which makes 7 GB in a rolling week’s worth of video, which is small enough to fit comfortably in my free Google Drive account, without needing to upgrade to a paid tier of storage.

Water sensor

Since my Raspberry Pi still had nearly all of its processing power still left over, I decided to give it some more responsibility.

About a month ago the sewer drain in the house became clogged, which caused it to back up and spill out into the basement.  Fortunately I was in the basement while this was happening and caught it before it could do much more damage. An emergency plumber was called, and the drain was snaked successfully (turned out to be old tree roots).  However, from now on I wanted to be warned immediately in case this kind of thing happens again.

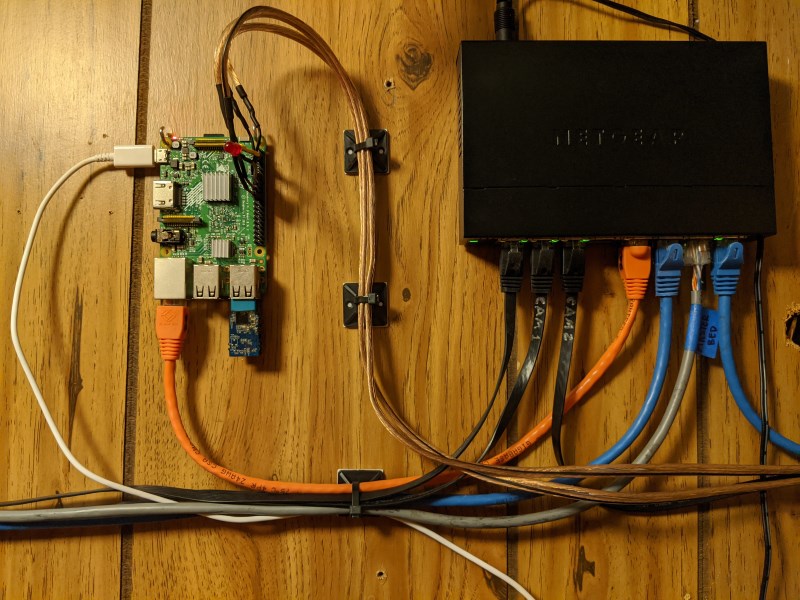
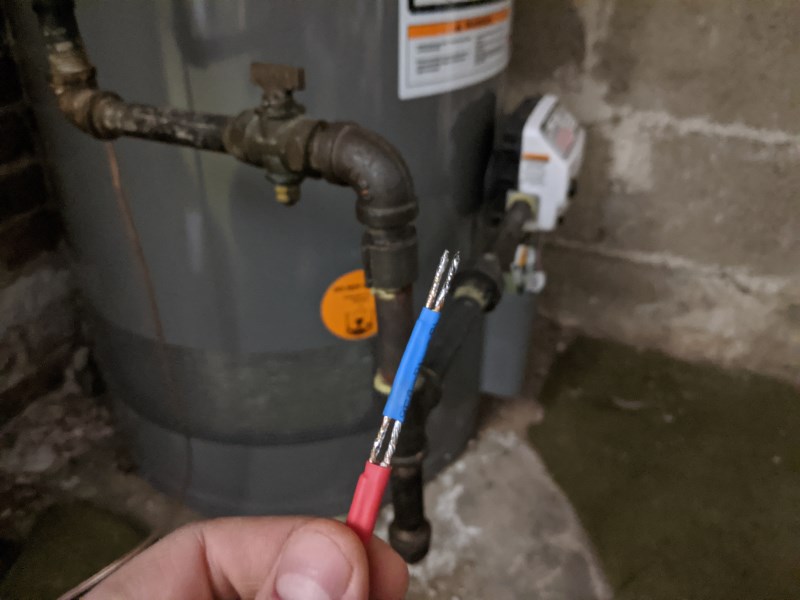
So I built a very simple water sensor and connected it to the Raspberry Pi.  In fact “very simple” is an understatement: the sensor is literally two wires, close together, which will short out if they come into contact with water.  I used some very cheap speaker wire, and routed it from the RPi to the drain from where the water can potentially spill out.

On the Raspberry Pi, one wire is connected to ground, and the other is connected to a GPIO pin with a pull-up resistor enabled. This means that if the wires are shorted out, the GPIO input will go from HIGH to LOW, and this will be an indication that water is present. The sensor is being monitored by the same Python script that monitors and uploads the camera footage, and will automatically send me an email when the sensor is triggered.

For good measure, I installed a second water sensor next to our hot water tank, since these have also been known to fail and leak at the most inconvenient times.

And that’s all for now. The Raspberry Pi still has plenty of GPIO pins left over, so I’ll be able to expand it with additional sensors and other devices in the future.

Notes

Here are just a few random notes related to getting this kind of system up and running:

Enable shared NFS folder(s)

Install the necessary NFS components:
$ sudo apt-get install nfs-kernel-server portmap nfs-common
Add one or more lines to the file /etc/exports:
/folder/path_to_share *(rw,all_squash,insecure,async,no_subtree_check,anonuid=1000,anongid=1000)
And then run the following:
$ sudo exportfs -ra
For good measure, restart the NFS service:
$ sudo /etc/init.d/nfs-kernel-server restart

Run script(s) on startup

  • Add line(s) to /etc/rc.local
  • If it’s a long-running script, or continuously-running, then make sure to put an ampersand at the end of the line, so that the boot process can continue.

Automatically mount USB drive(s) on boot

When the Raspberry Pi is configured to boot into the desktop GUI, it will auto-mount USB drives, mounting them into the /media/pi directory, with the mount points named after the volume label of the drive. However, if the Pi is configured to boot into the console only (not desktop), then it will not auto-mount USB drives, and they will need to be added to /etc/fstab:
/dev/sda1 /media/mount_path vfat defaults,auto,users,rw,nofail,umask=000 0 0

(The umask=000 parameter enables write access to the entire disk.)

Set the network interface to a static IP

Edit the file /etc/dhcpcd.conf. The file contains commented-out example lines for setting a static IP, gateway, DNS server, etc.

And lastly, here are a couple of Gists for sending an email from within Python, and uploading files to a specific folder on Google Drive.

Reverse-engineering the QICStream tape backup format

TLDR: I developed an open-source tool to read tape backup images that were made using the QICStream tool, and extract the original files from them.

During a recent data recovery contract, I needed to recover files from some old QIC tapes. However, after reading the raw data from the tapes, I couldn’t recognize the format in which the backup was encoded, and none of the usual software I use to read the backups seemed to be compatible with it.

After briefly examining the backup in a hex editor, it was evident that the backup was fortunately not compressed or encrypted, and there were signs that the backup was made using a tool called QICStream.  There doesn’t seem to be any documentation regarding this utility (or the format of the backup it saves) on the web. It’s easy enough to find the tool itself on ancient DOS download sites, and it may have been an interesting project to create an emulated DOS environment where the QICStream tool reads the backup from an emulated tape media, but it turned out to be much easier to reverse-engineer the backup structure and decode the files from the actual raw data.

The binary format of the backup is very simple, once you realize one important thing:  every block of 0x8000 bytes ends with 0x402 bytes of extra data (that’s right, 0x402 bytes, not 0x400). In other words, for every successive block of 0x8000 bytes, only the first 0x7BFE bytes are useful data, and the last 0x402 bytes are some kind of additional data, possibly for parity checking or some other form of error-correcting logic. (I did not reverse-engineer the true purpose of these bytes; they did not turn out to be important in the end.)

Other than that, the format is very straightforward, and basically consists of a sequence of files and directories arranged one after the other, with a short header in front of each file, and “control codes” that determine whether to descend into a subdirectory or to navigate back out of it.

Anyway, I put all of these findings into a small open-source utility that we can now use to extract the original files from QICStream backups. Feel free to look through my code for additional details of the structure of the file headers, and how the large-scale structure of the backup is handled.