[Disclaimer: Modding your phone probably voids all kinds of warranties, and is not recommended for anyone.]
Update: I found a better program for RAZR hacking!
This is a quick-start guide for anyone who wants to start hacking away at the RAZR V3xx. For some reason, other guides that I’ve found on the web either don’t apply to this particular model, or often contradict themselves and drove me into further confusion.
I recently “upgraded” my cell phone to a V3xx, with AT&T as my provider. Naturally I wanted to see what kind of features I could access within the phone, and to what extent I could customize its skin, sounds and interface.
Here is the exact sequence of steps I took to get my phone connected to my PC and start modifying its filesystem:
- Go to hacktherazr.com, which is a site with plenty of loosely-knit resources for hacking the RAZR. The only drawback of the site is that it doesn’t contain any information specific to the V3xx, and all of their “get-started” guides only pertain to earlier models.
- From the site’s “Start here” guide (not from their “Downloads” section), download the Motorola USB Driver Installer, install the drivers, and follow the rest of the “Start here” guide.
- From their “Downloads” section, download and install “PST 7.2.5,” which is a utility from Motorola to facilitate communication with your phone. Make sure you apply the “patch” included in the Zip file! Installing this tool will probably require you to restart your computer.
- The last tool that you’ll need is called P2K Commander. But do not use the version that they have on their site — it’s outdated and will not communicate with the V3xx! To get the latest version of P2K Commander, go to the author’s website and download it from there. As of this writing, the latest version is 4.9.D. The author requires you to register in his forums to download the files, but registration is free.
- To prepare your phone for communicating with your PC, you must set its USB mode to “data connection.” To do this, go to Main Menu → Settings → Connection → USB Settings, and set the Default Connection to “Data Connection.”
- On your PC, launch the PST Phone Programmer before you plug in your phone! Let PST load completely before plugging in.
- Now plug in your phone, and give your PC a few seconds to recognize it. Then give PST a few more seconds to configure the phone for communication. You should hear the phone’s “charging” sound two or three times as it’s being configured, as well as the PC’s USB plug/unplug sound.
- Now you’re ready to launch P2K Commander, so launch it. P2K Commander is a gateway to the phone’s internal filesystem. But, before doing anything in this tool, click on its “Options” menu, and check the “Use P2k05” check box! This is the critical step, since the V3xx uses the P2k05 command set, unlike its predecessors.
- Finally, you’re ready to use P2K Commander to your heart’s content. From this point on, you’re welcome to follow the other guides outlined at hacktherazr.com, since most of them still apply.
Here is a very simple example of what could be done with P2K Commander and the RAZR V3xx:
Changing the secondary display image
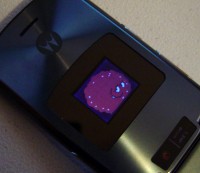
When the phone is opened, its secondary display (the smaller display on the outside) only displays the AT&T logo. But suppose you wanted it to display something that was meaningful to you, such as this:
 To change this graphic, use P2K Commander to navigate to the phone’s file system (“/a”) and go to the “mobile” directory.
In this directory, there is a file called cl.gif. That’s the file that gets displayed in the secondary display! This means that you can replace this file with whatever you want (as long as it’s called cl.gif), and it will be shown! Of course, keep in mind that this file must be a GIF file with dimensions of 96 x 80. Et voilà :
 Short of reprogramming the phone’s firmware, there’s no end to the customizations you can make to your V3xx by simply editing or replacing certain files in the phone’s filesystem using P2K Commander. As always, don’t forget to back up any files you edit or replace. Enjoy!